Minutes Ago keeps recording and deletes audio and transcripts older than Keep the last as it goes. Until you save it, this recording is called live audio. How far back you can go right now is shown on the first line of the menu (“Recording · 1:29:40 kept” means about 1 hour 30 minutes). You save a range from within that, either as files in your export folder or as a saved recording that stays in the app.
Save the Last
Right after a meeting, Save the Last ▸ in the menu is the quickest way. Pick a length in the submenu and Minutes Ago saves that much audio and transcript to your export folder, without asking.
- Lengths: 5, 15, 30, 60 or 90 Minutes.
- The first time, a panel asks you to choose the export folder (Export folder).
- After saving, the exported file is shown in Finder.
- An item is marked “(Free Try)” only when choosing it now uses a free try (for example 60 or 90 Minutes), and “(Pro)” when none are left (what is free).
To set the range precisely, to identify speakers and write minutes, or to keep the meeting in the app, use the Recordings & Minutes window.
Keep the last
Keep the last in Settings › General sets how far back you can go.
- Choices: 30 min, 1 h, 90 min (default), 2 h, 4 h, 8 h, 24 h.
- There is no unlimited setting. The longest is 24 hours. To keep something longer, save it (Saved recordings).
- Audio and transcripts older than this are deleted automatically every 15 seconds. If you shorten it, whatever falls outside goes at the next deletion.
- During a meeting, nothing from its start is deleted until the meeting ends (up to 24 hours).
- Audio is kept in 30-second pieces and deleted piece by piece. Because of this, the first menu line can show slightly more than the setting (for example “1:31:30 kept” with 90 minutes).
- By default, live audio is kept only in this Mac’s memory and written to the SSD once when the app quits (Data and Privacy).
Pause
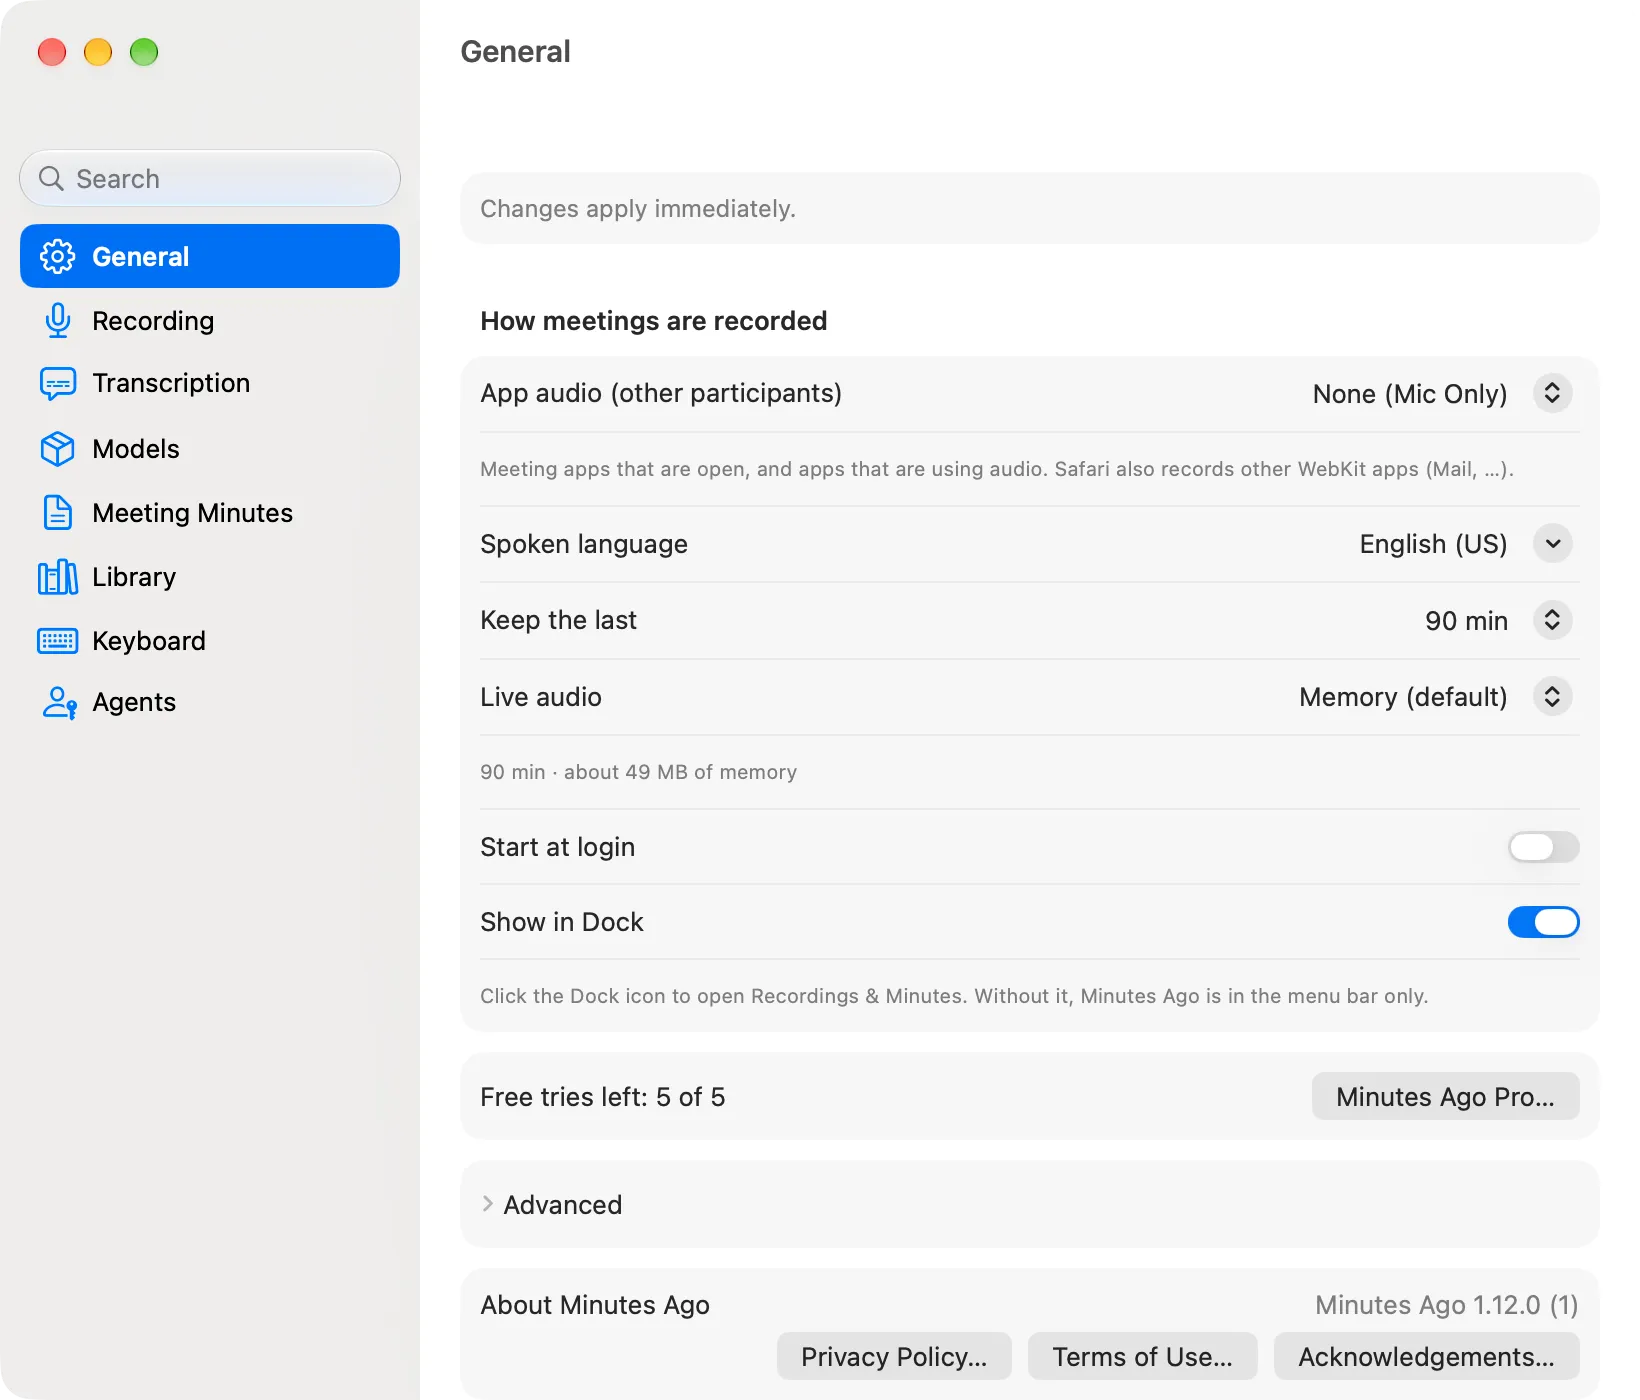
When you don’t want to record, pause from the menu or from the Recordings & Minutes window.
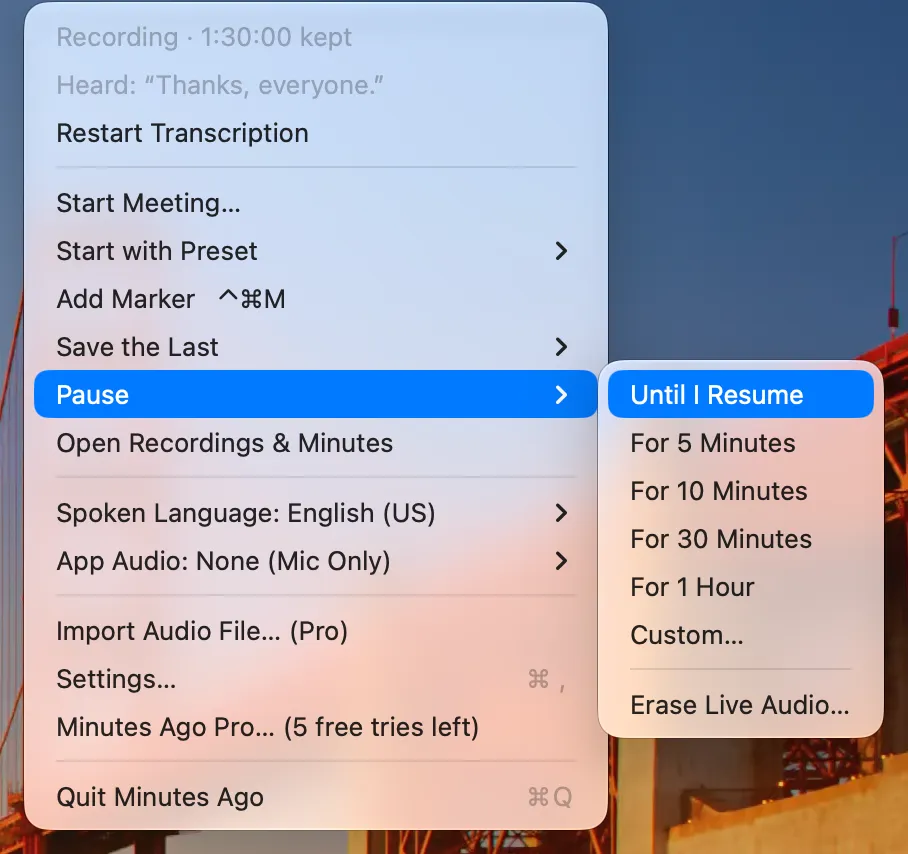
- Pause ▸ in the menu — choose Until I Resume, For 5 Minutes, For 10 Minutes, For 30 Minutes, For 1 Hour, or Custom…. Custom… opens a small Pause Recording window: “Pause recording for [ ] minutes” (1 to 480 minutes), with the time it resumes below; click Pause.
- Pause ▾ in the window — in the live pane’s meeting bar, next to Start Meeting…. Clicking it pauses until you resume; its ▾ has the same choices as the menu.
- While paused, the menu bar icon’s bars turn faint and the first line reads “Paused · … kept”. For a set time it reads “Paused · Resumes at 14:35 · 12:03 left”, and the window’s bar and Live in the left pane show “Resumes at 14:35 · 12:03 left”.
- To resume by hand, choose Resume Recording in the menu (it takes the place of Pause ▸) or in the window (it takes the place of Pause ▾).
- A pause for a set time lasts through a restart of the app or the Mac: recording starts again at the time shown (if that time passed while the Mac was asleep, it starts when the Mac wakes). Until I Resume ends when Minutes Ago restarts.
- Pausing does not delete what is already kept (it still expires after Keep the last).
- During a meeting, the menu has Pause Meeting instead, and the window’s Pause pauses the meeting, until you resume it (Pausing a meeting).
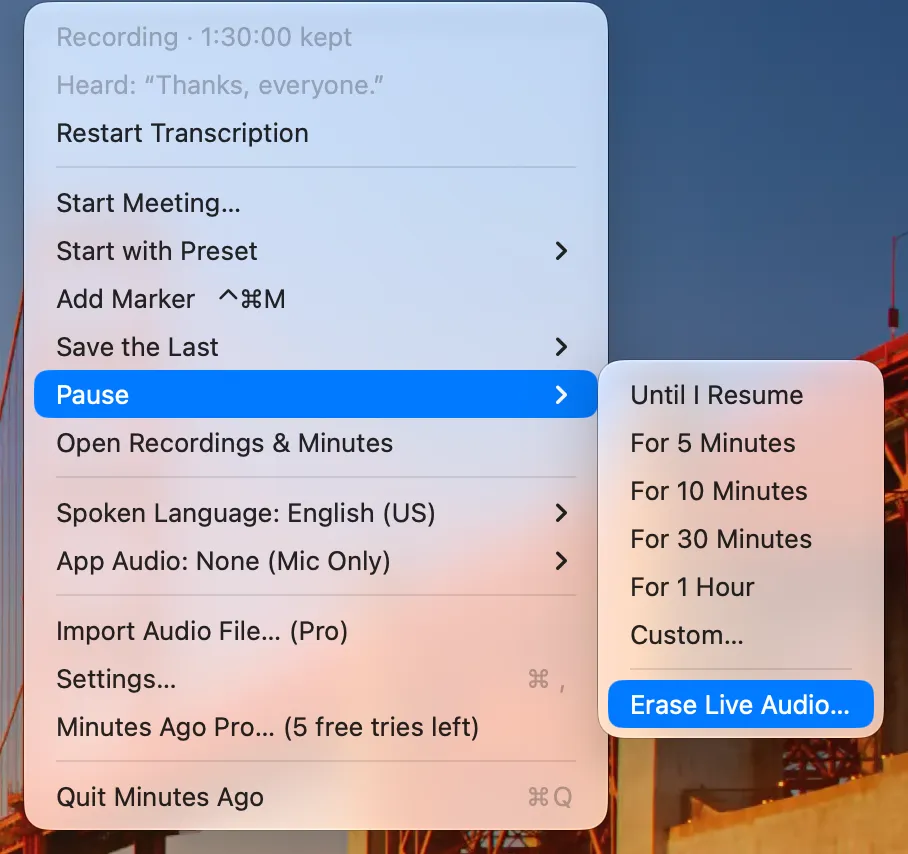
Erase Live Audio
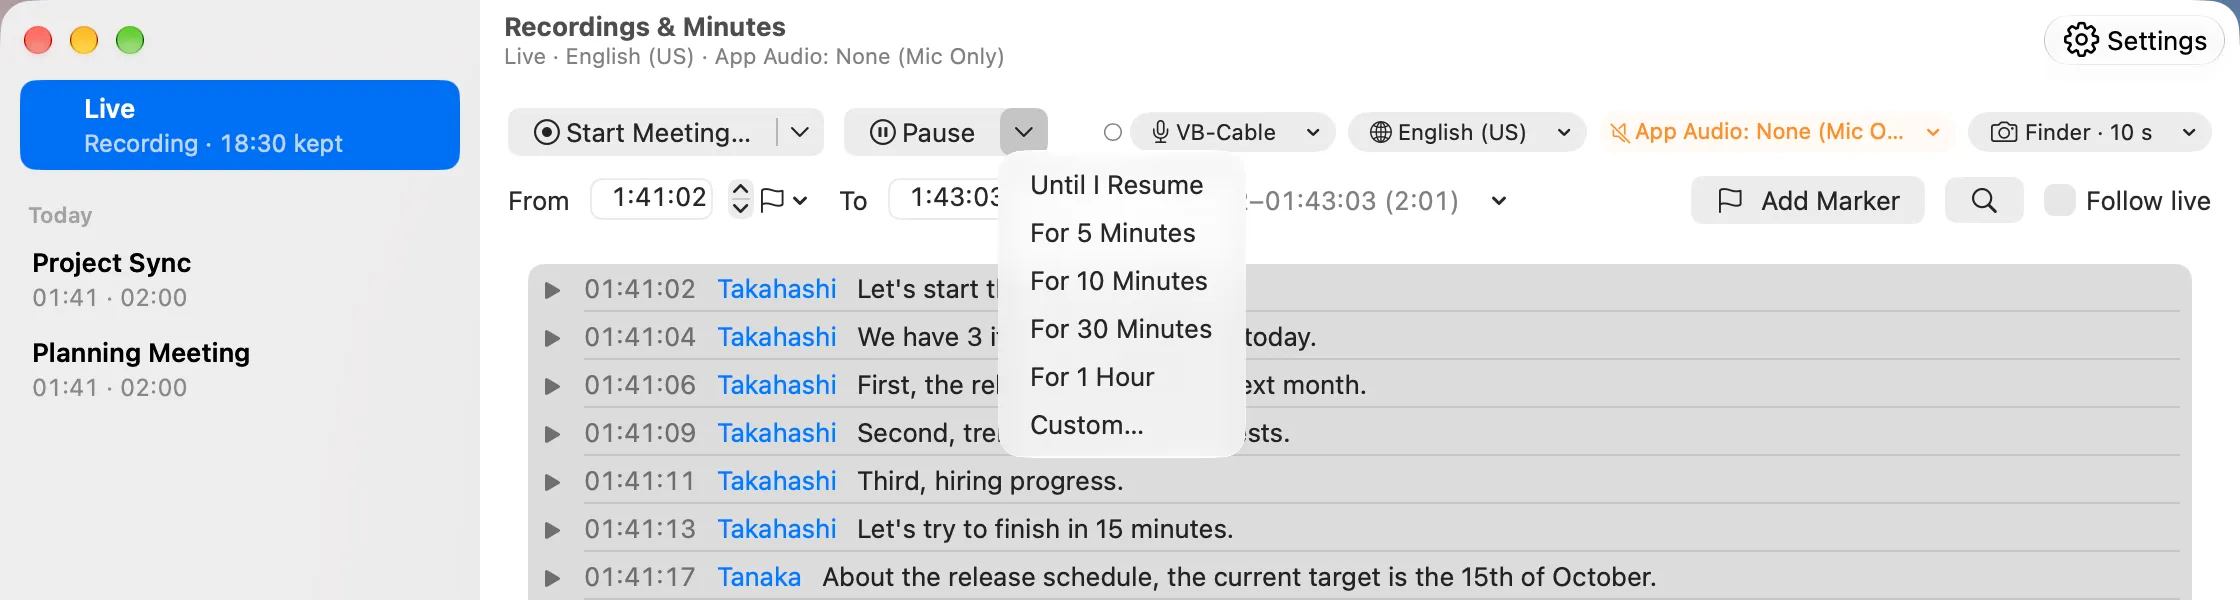
Erase Live Audio… at the end of Pause ▸ (with ⌥ next to Resume Recording while paused) deletes the live audio and its transcript (including speaker labels, names and markers) on the spot.
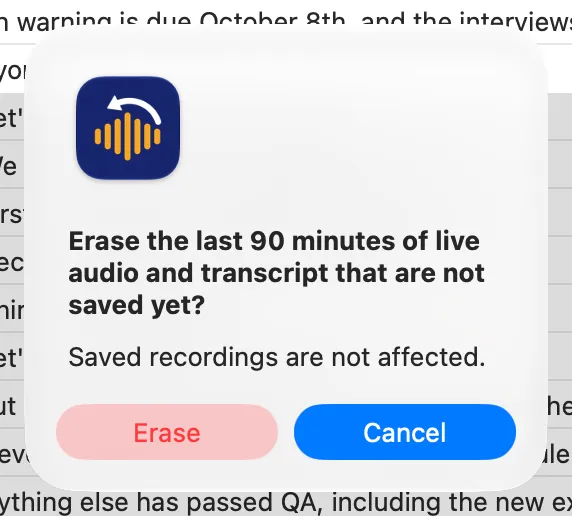
- It always asks first: “Erase the last 90 minutes of live audio and transcript that are not saved yet?” with “Saved recordings are not affected.” Cancel is the default, so Return and Esc erase nothing; only clicking Erase does.
- During a meeting, it also discards the meeting in progress and its screenshots.
- Saved recordings and files you have already exported are not touched. To delete all saved recordings, use Delete All Saved Recordings… in Settings › Library.
The Recordings & Minutes window
Open Recordings & Minutes in the menu opens the Recordings & Minutes window (it was the timeline window before version 1.4). The left pane has Live at the top and your saved recordings below it, by day. The right pane shows what you choose on the left.
At the bottom of the left pane, “Recordings: 3 · 3.3 MB” shows how many recordings you have and their size, and the + at its right imports an audio or video file as a new recording. You can also drop a file anywhere on the window (Importing Audio Files, Minutes Ago Pro).
- Live — the live audio: the lines kept, with their times, and the buttons to take a range out.
- A saved recording — that recording as a whole (Saved recordings).
Each time you open the window, it starts on Live.
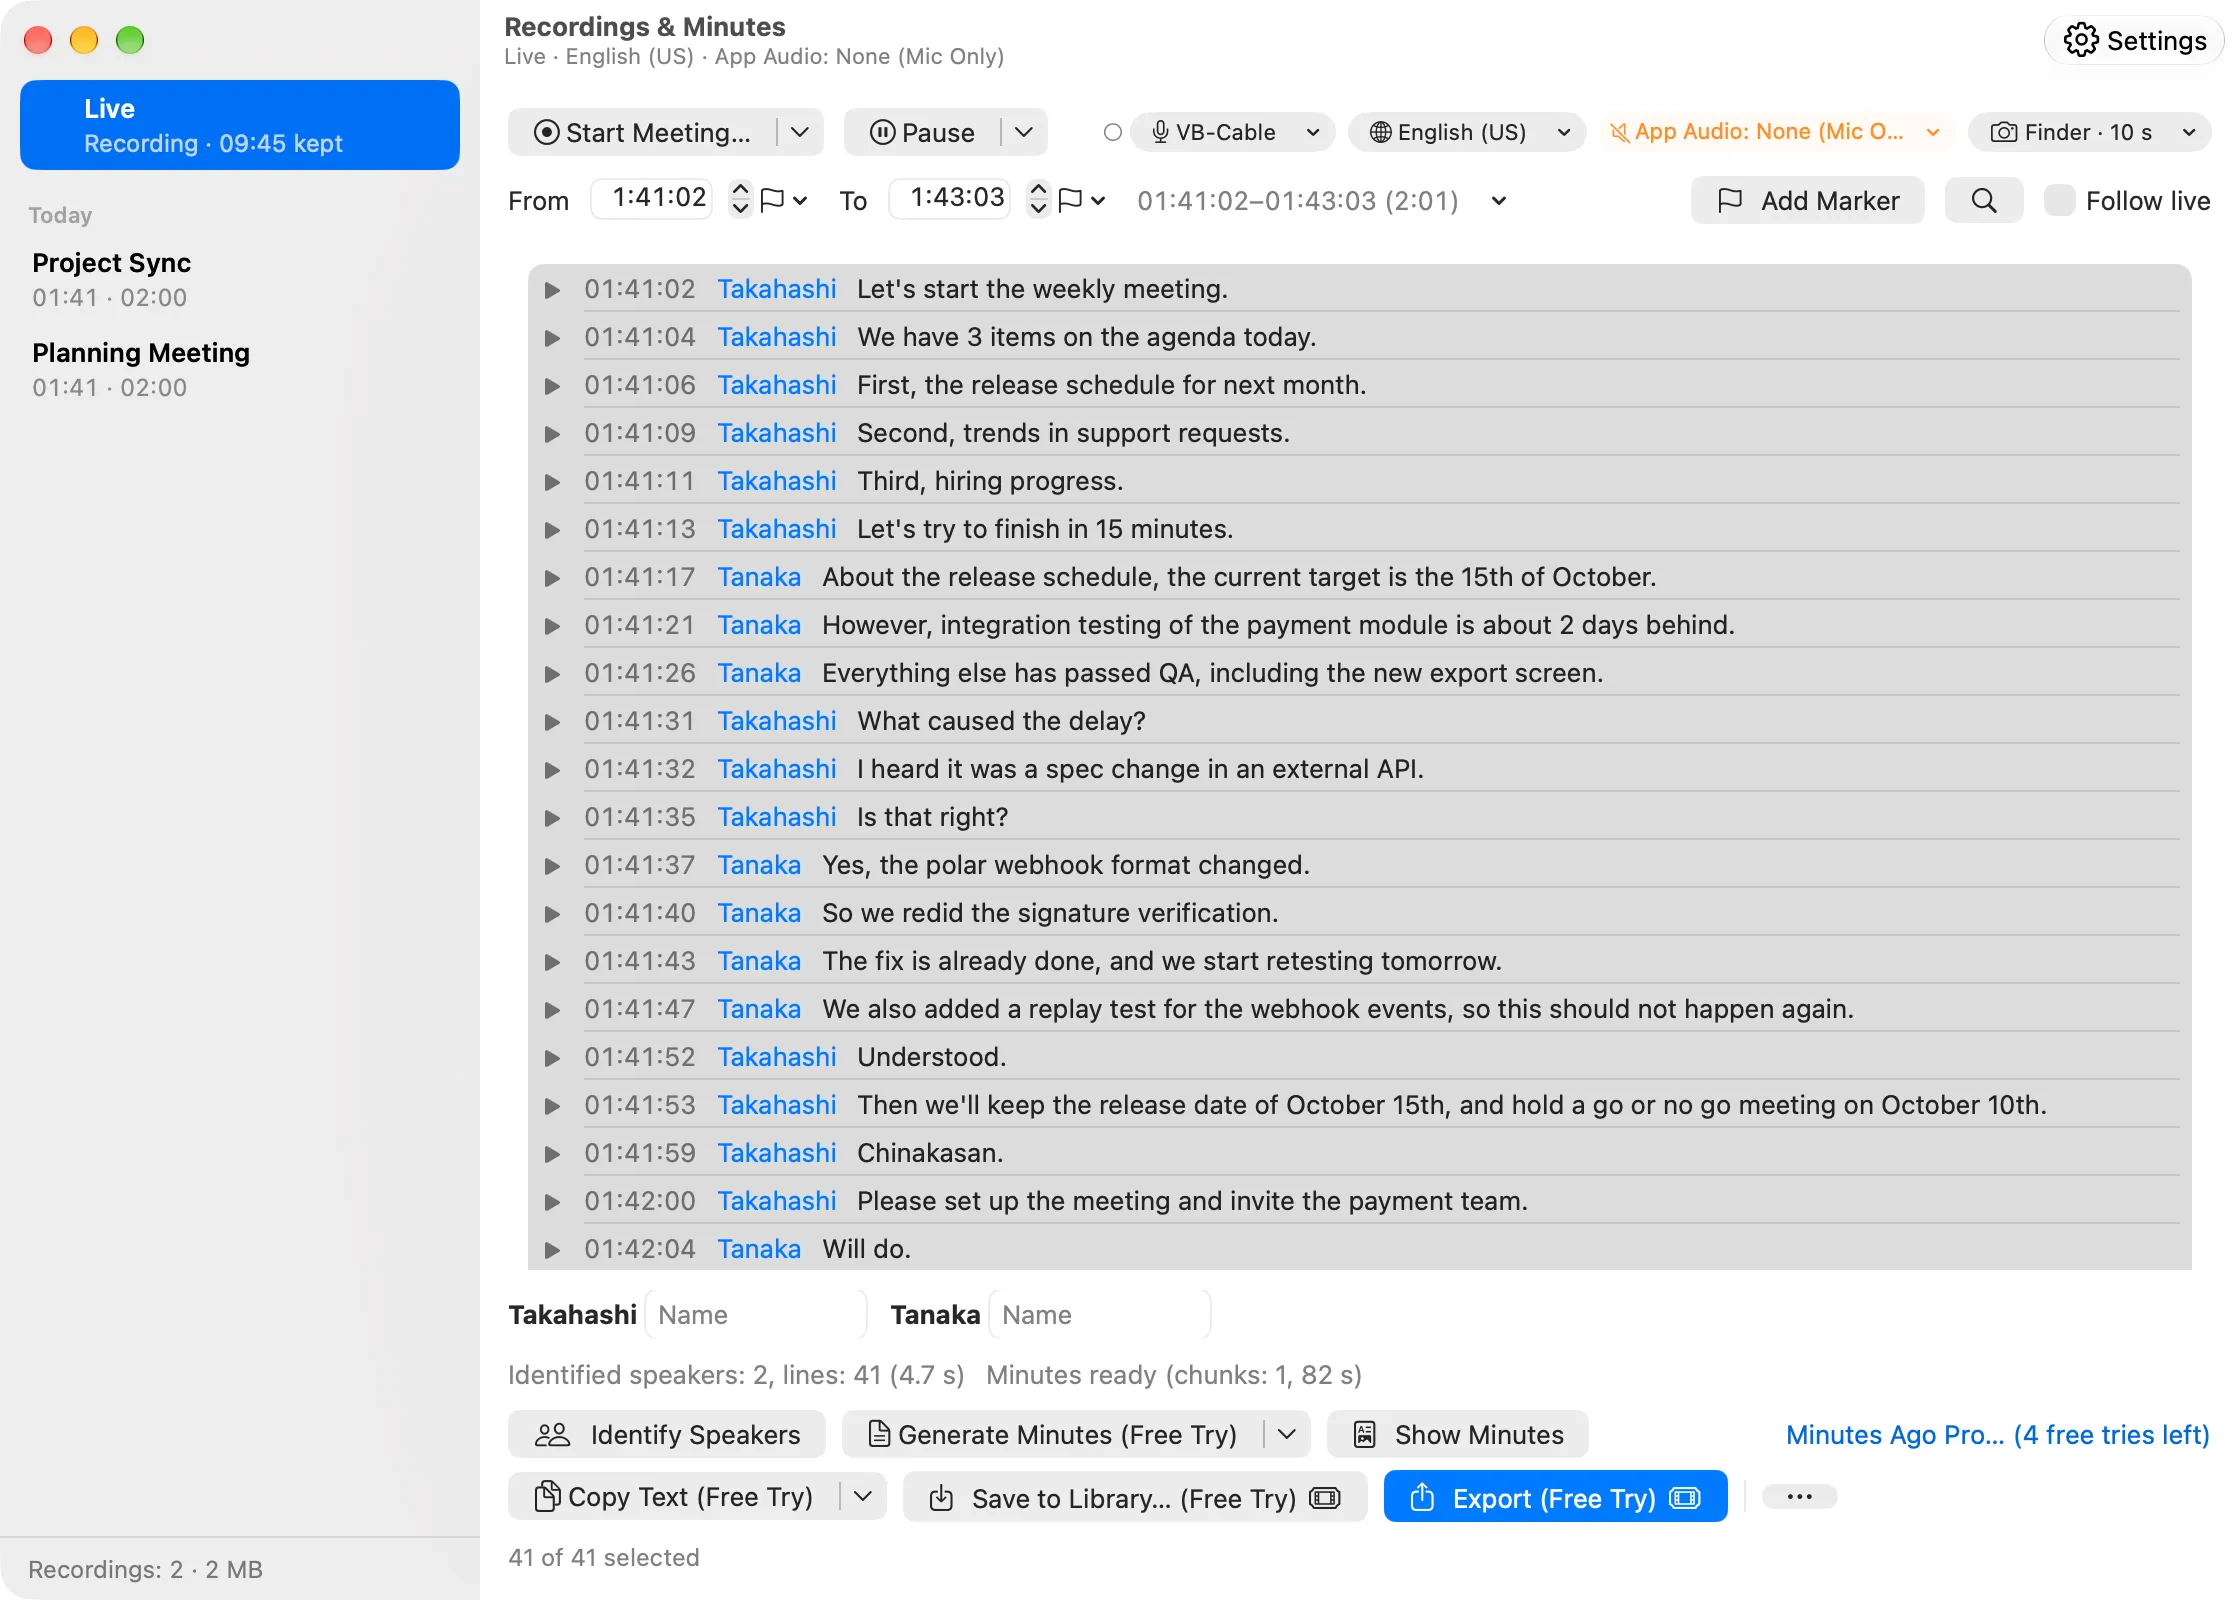
The live pane
From the top:
- The meeting bar — Start Meeting… and its ▾ (Meetings) and Pause ▾ (Pause); during a meeting, Stop & Save Meeting, Pause and Add Screenshot. On the right, four chips show how you are recording now and change it on the spot: the microphone, the spoken language, App Audio (the other participants) and screenshots. A chip turns orange with a slashed icon when the microphone or App Audio is None. A small dot left of the microphone and App Audio chips shows whether sound is arriving and being transcribed (Transcription and Models). If the microphone could not start, an orange line with Try Again appears in the bar (Microphone).
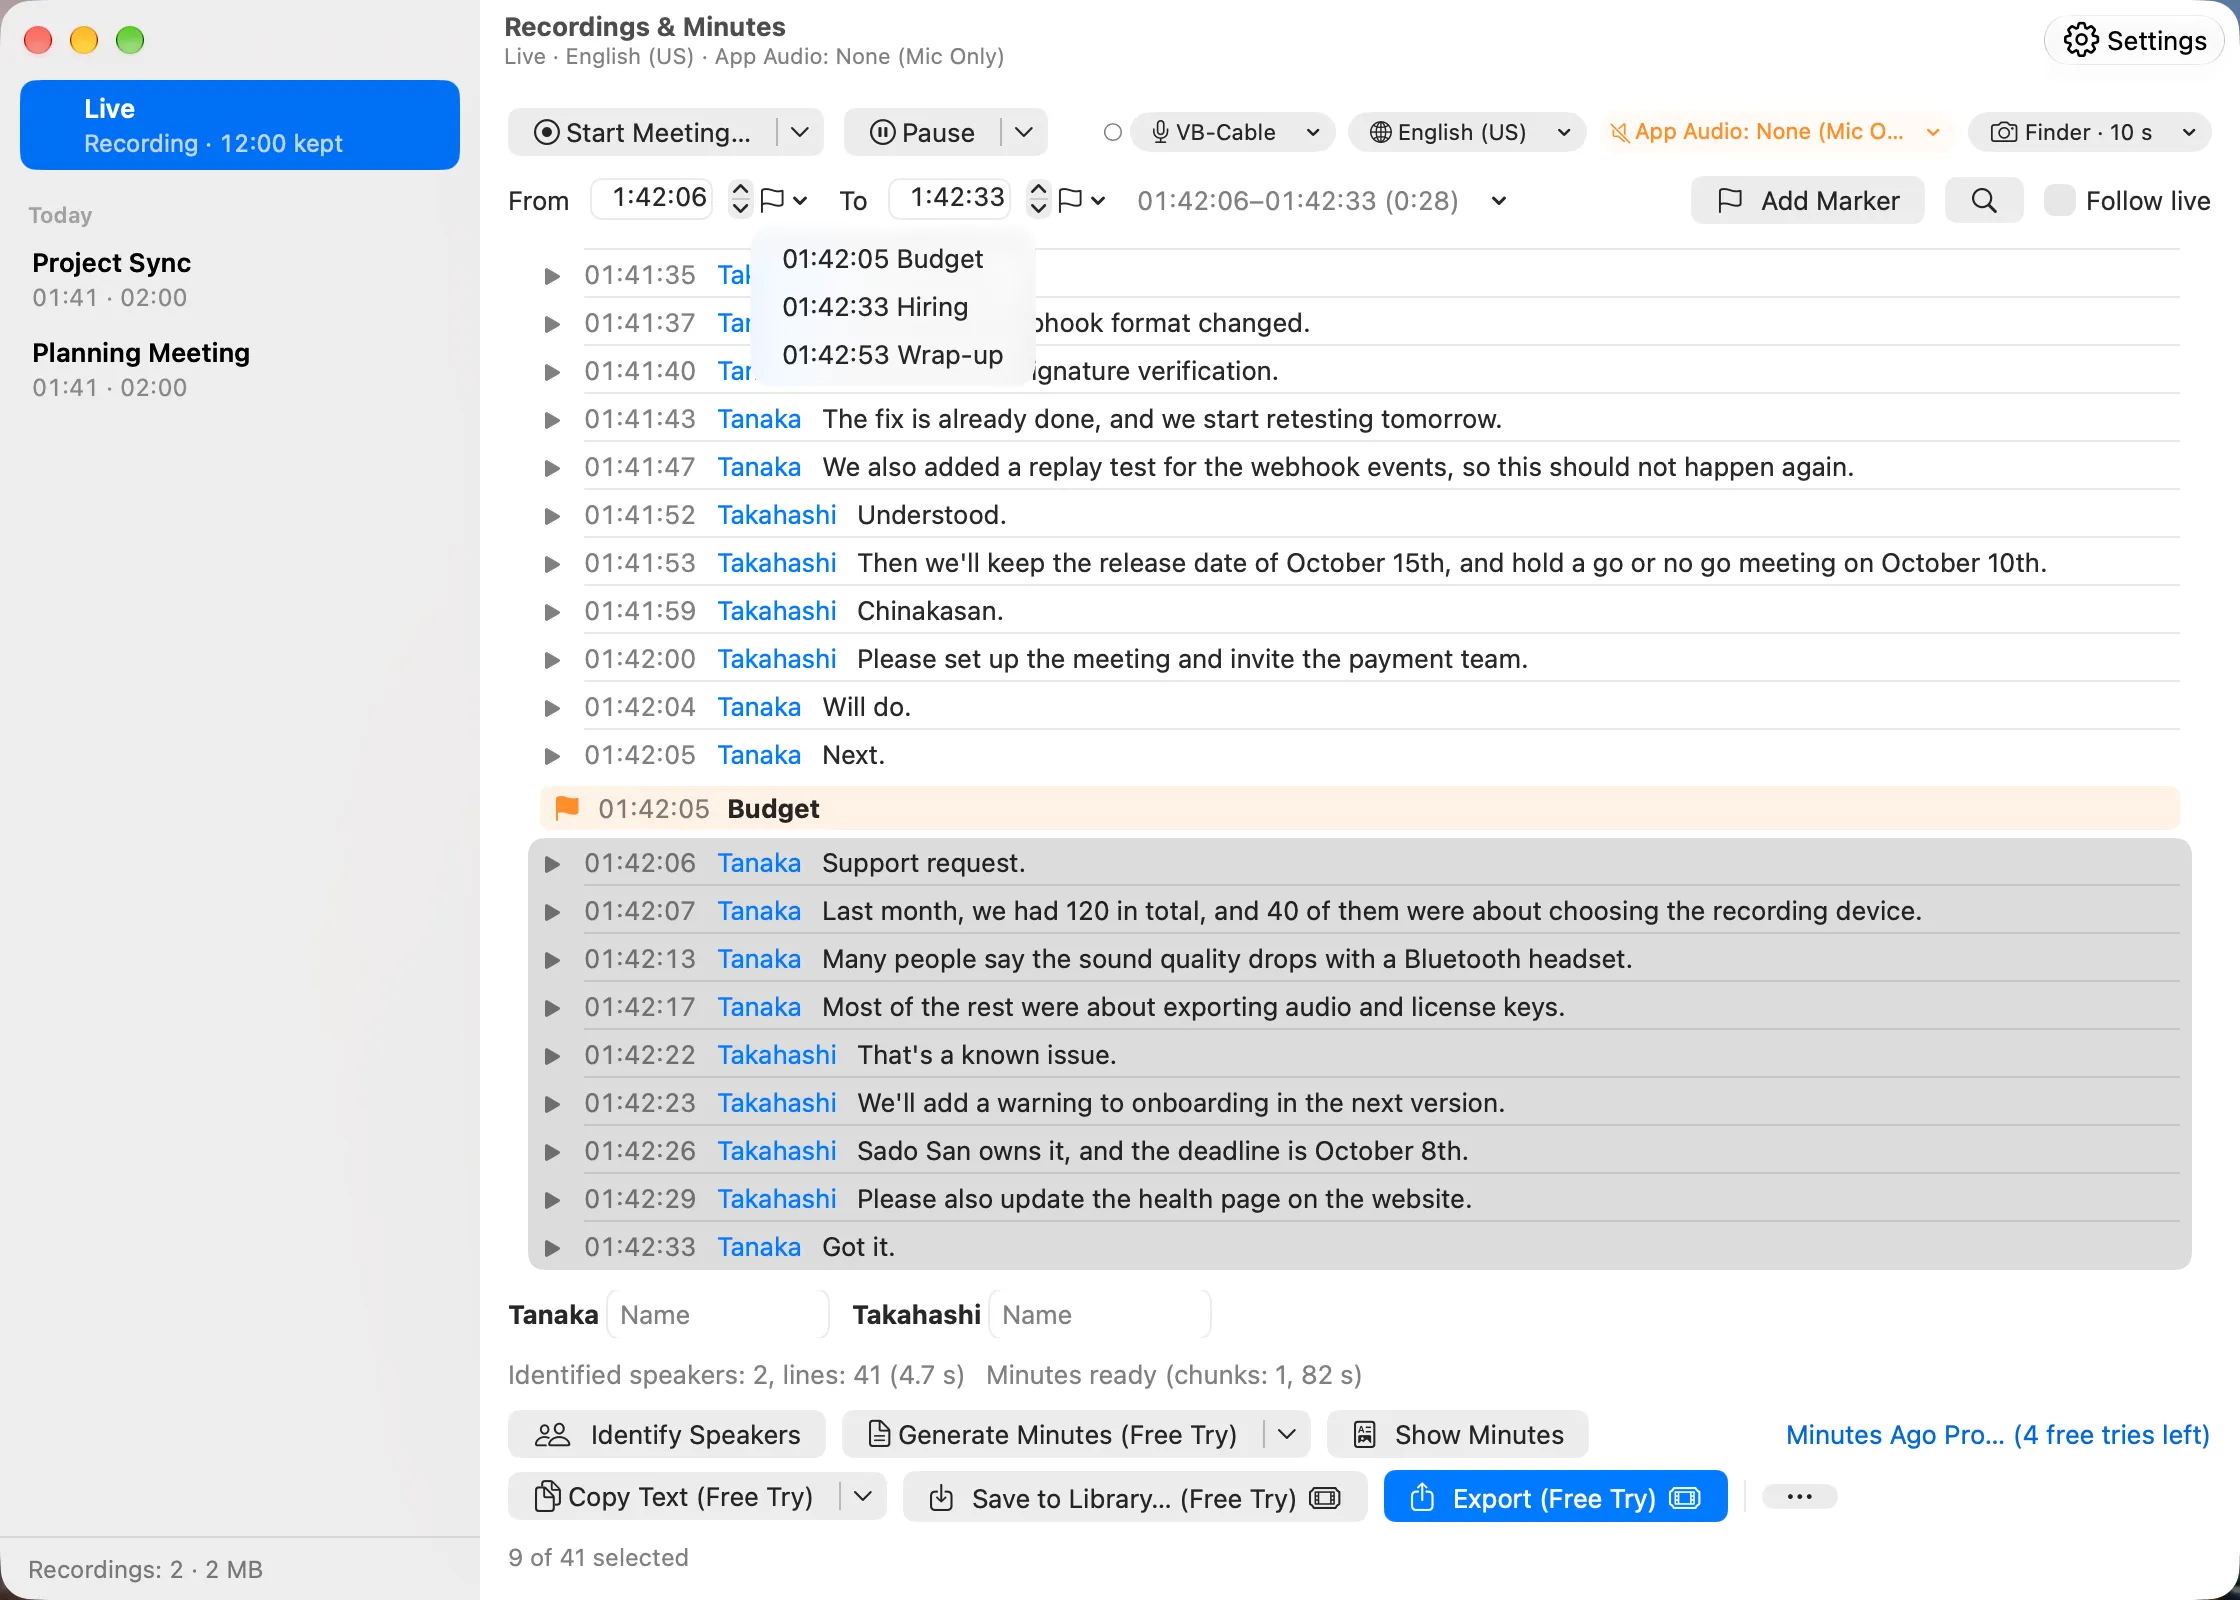
- The range bar — the From and To times, the ▾ for quick ranges, Add Marker, the magnifying glass (Search) and Follow live.
- The list — the lines kept, each with a ▶ (Playing lines), its time and speaker, and markers between them. When it is empty, it explains the first steps.
- The buttons, then a status line. While you play audio, the playback bar appears under the list.
The window’s subtitle repeats the state, for example “Live · English (US) · App Audio: zoom.us”.
Choosing a range
You can set the range in these ways. The selected lines and the From and To times follow each other whichever you use.
- Select lines — click a line, and Shift- or Command-click to select several. The range runs from the start of the first selected line to the end of the last.
- Set times — enter From and To (hours, minutes, seconds). The lines that overlap the range are selected. Lines that only touch the edge of the range are not included.
- The ▾ after the range — Last 5, 15, 30 or 60 Minutes, This Meeting (during a meeting) and Since the Last Marker, each up to now.
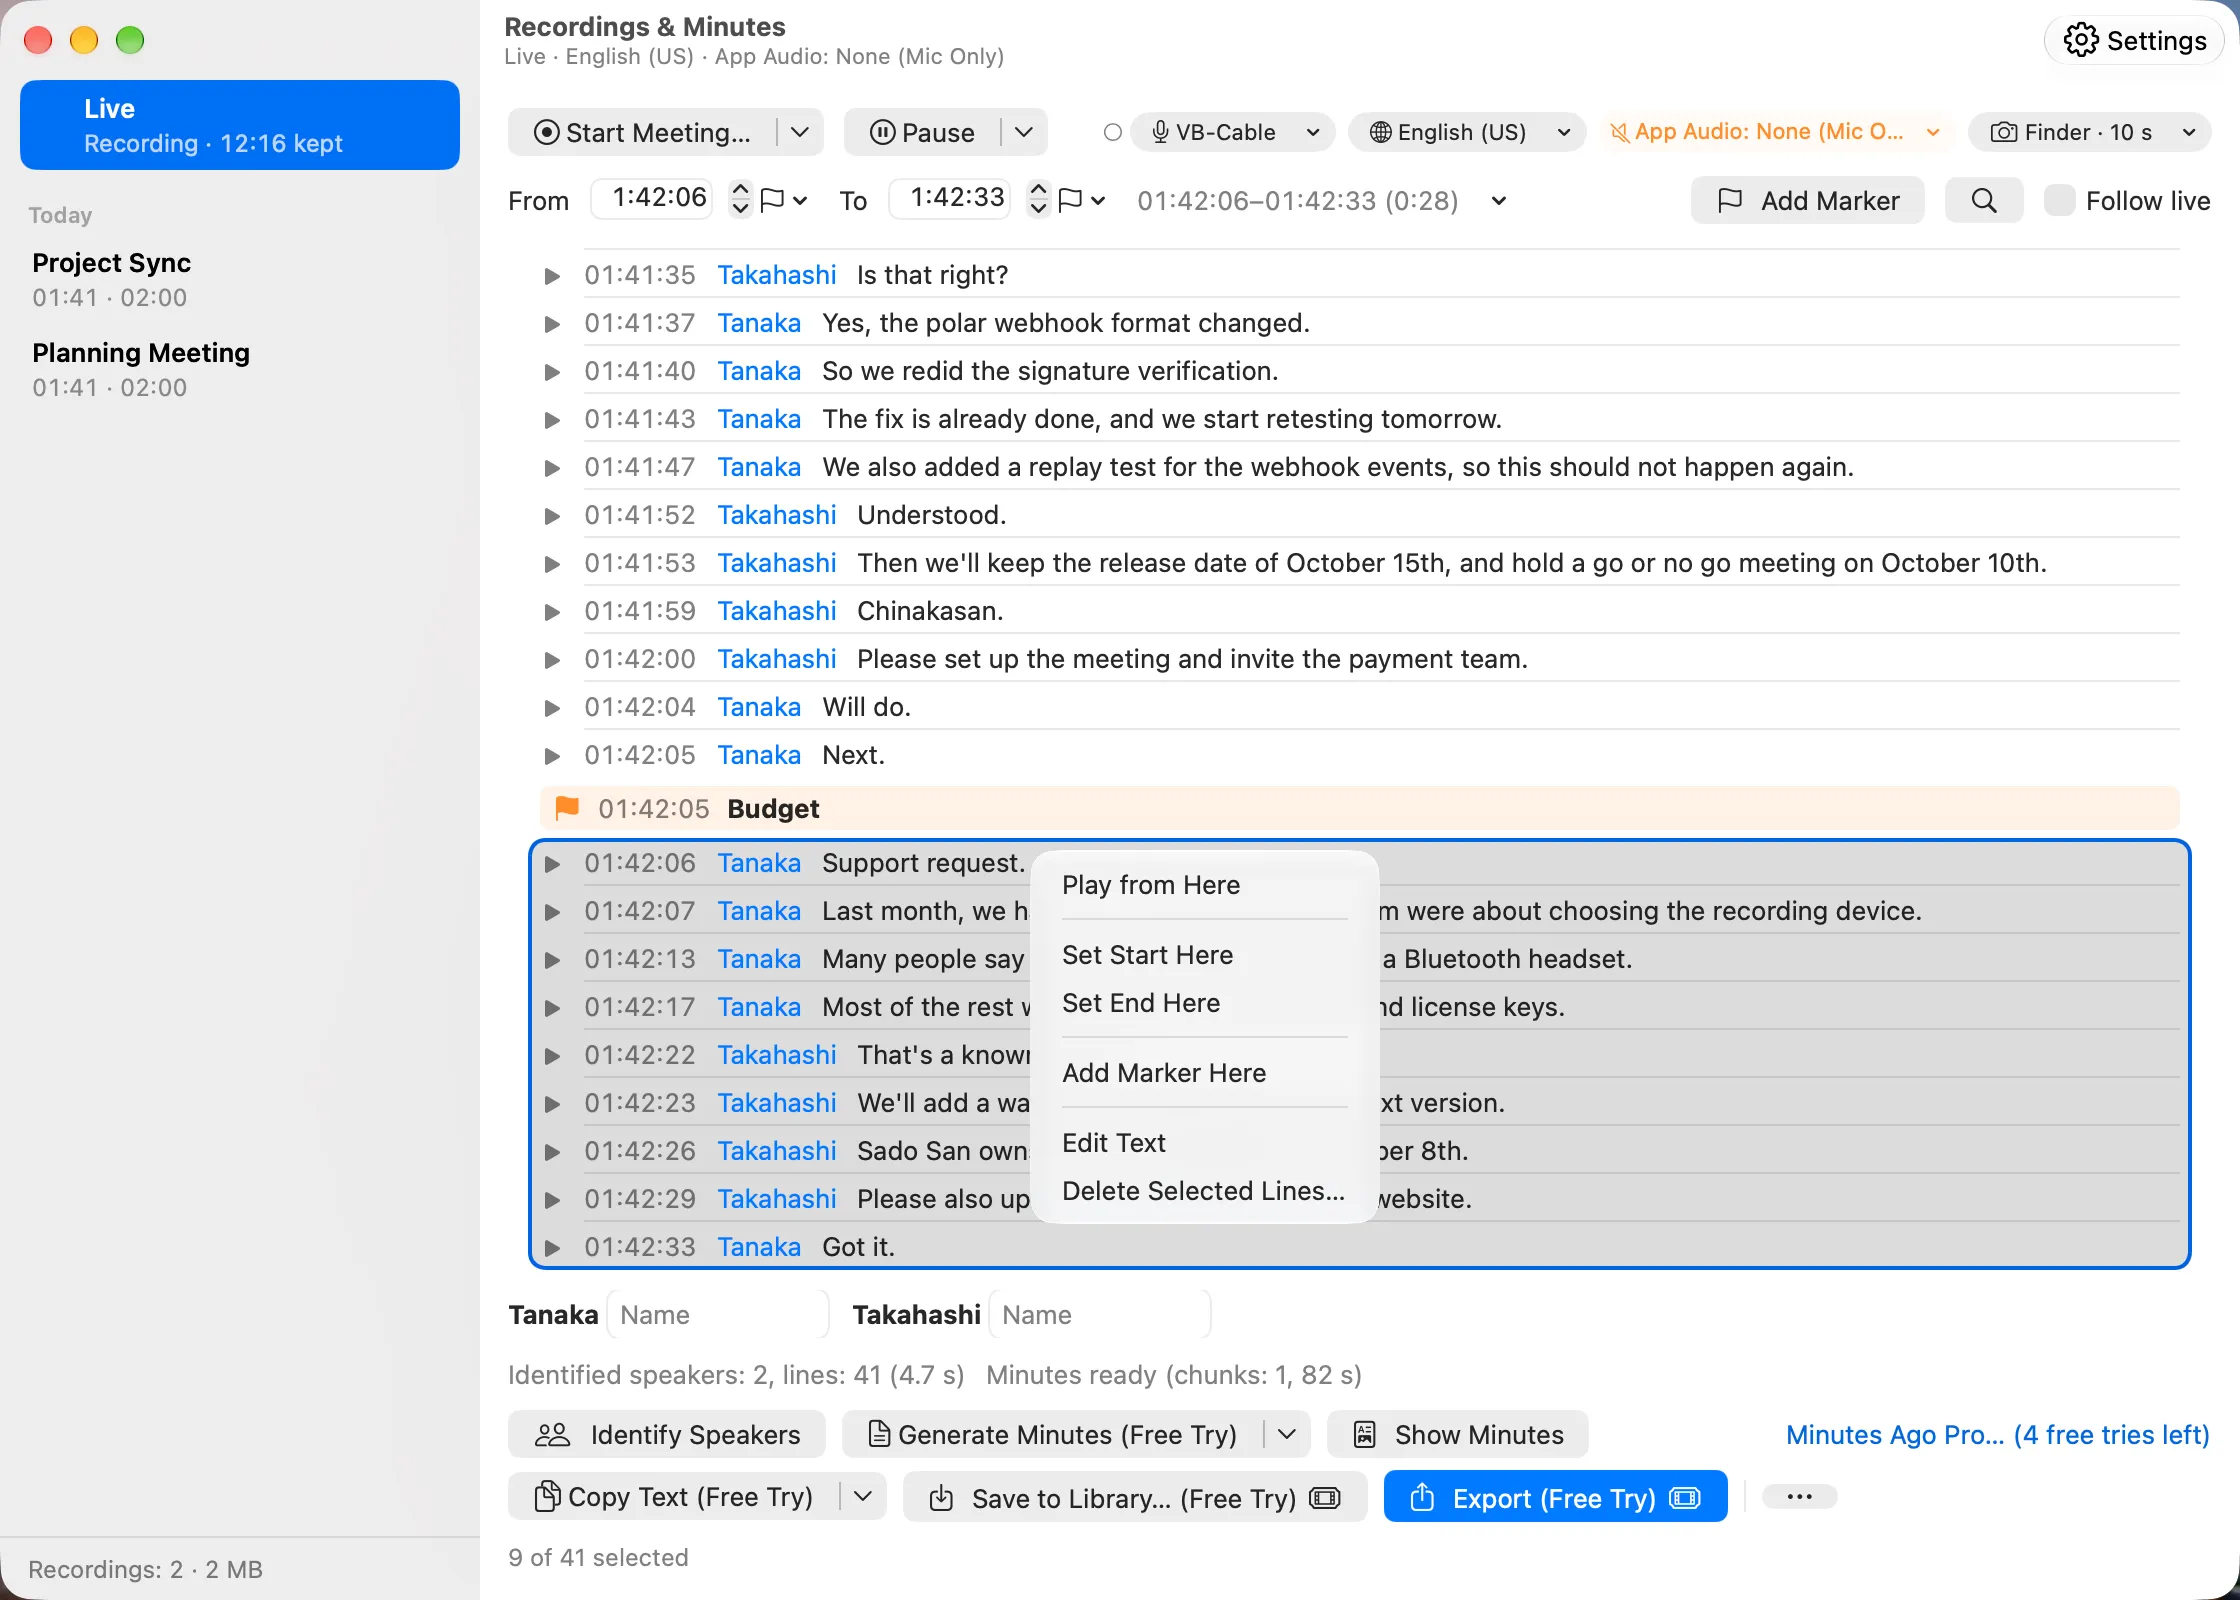
- Right-click a line — Set Start Here makes the start of that line the start of the range; Set End Here makes the end of that line the end of the range.
- From markers — right-click a marker row, or use the flag buttons next to From and To (Making a range from markers).
The number of selected lines is shown, for example “10 of 40 selected”.
The same right-click menu of a line starts with Play from Here (Playing lines) and ends with Edit Text and Delete Line (Editing and deleting lines).
Follow live
The list loads new lines every 3 seconds. Turn on Follow live to keep the list at the end (now). It turns off by itself when you move to a search match, make a range from a marker, start playing or start editing a line.
Playing lines
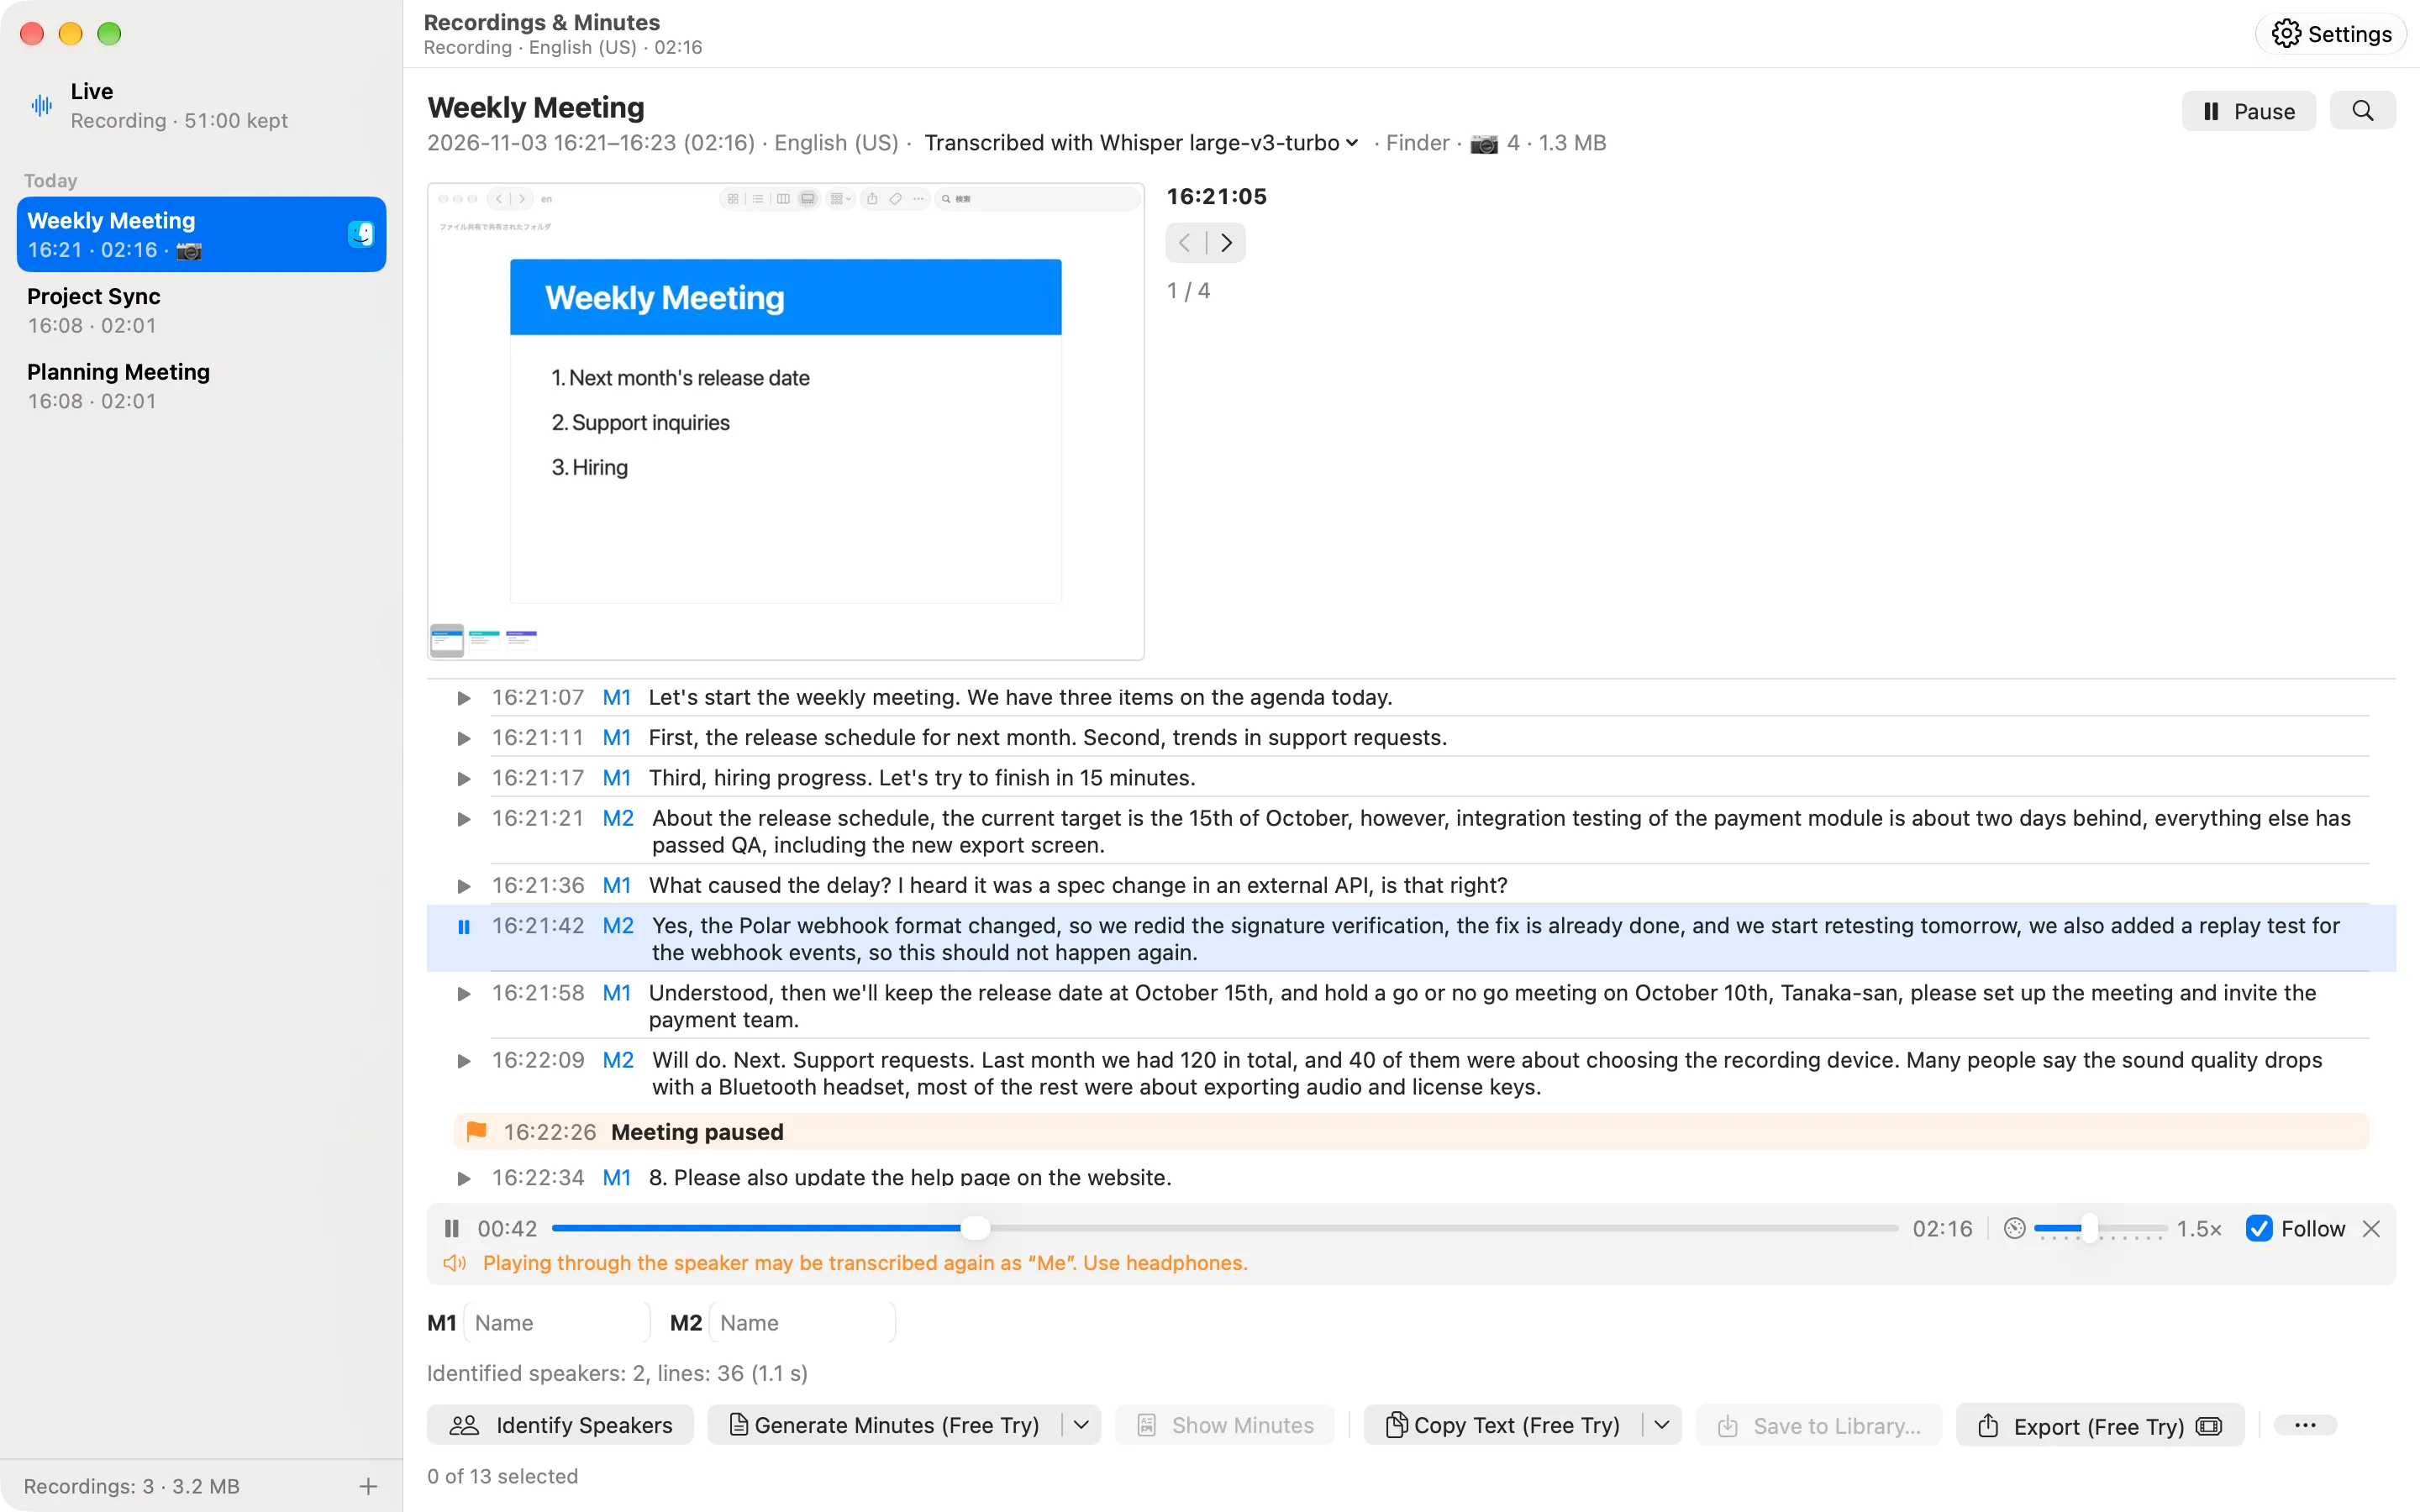
Every line in the live pane and in a saved recording has a ▶ left of its time (“Play from this line”). Click it, or right-click the line and choose Play from Here, to hear the audio from that line. In a saved recording, Play in the header plays it from the start.
- The playback bar appears under the list: ▶ / ⏸, where you are, a seek bar, the length (in the live pane, the time up to which audio can be played), the Playback Speed slider from 0.5× to 3× (the pitch is kept; click the speed shown beside it, such as “1.5×”, to go back to 1×; the last speed is remembered), Follow, and ✕ to stop and close the player.
- The line being played is highlighted and shows ⏸. Follow keeps it in view. Scrolling the list by hand turns Follow off; playing again turns it back on. While you edit a line, playback goes on and only the scrolling stops.
- Space plays and pauses when the list has the focus. In a text field, Space types a space as usual.
- Both tracks, your microphone and the app audio, play together.
- In the live pane you can go back as far as audio is kept. Playback stops 30 seconds behind now, where the newest audio is still being written, and “Caught up with live” appears.
- When the sound comes out of the Mac’s built-in speaker, an orange note says “Playing through the speaker may be transcribed again as “Me”. Use headphones.” The microphone can pick up the speaker, and what it hears is transcribed again as your own lines.
- Playback stops when you switch to another pane, close the window, erase live audio, or delete the recording being played.
- Playing is free, like reading the transcript. Nothing leaves the Mac; the sound only goes to this Mac’s output.
Editing and deleting lines
You can fix a misheard line, or delete lines you don’t want, in the live pane and in a saved recording.
- Edit — double-click a line, or right-click it and choose Edit Text. The text turns into a field: Return saves it, Esc cancels it, and clicking elsewhere also saves it. Line breaks become spaces. An empty or unchanged line is not saved; to remove a line, delete it.
- Delete — right-click a line and choose Delete Line (Delete Selected Lines… when several lines are selected), or select lines and press ⌫. One line goes at once, and the status line shows “Line deleted” with Undo for 8 seconds. Two or more lines ask first (“Delete the selected lines?”); Cancel is the default, so only clicking Delete deletes them.
- Lines are removed from the transcript only; the audio is kept. Copy Text, exports, minutes, Save to Library… and agents use the edited transcript.
- Transcribe Again… makes the transcript again from the audio: deleted lines come back, and edited lines are replaced.
- In a saved recording, the right-click menu of a line also has Copy. Edits and deletions belong to the transcript of the model shown (A transcript for each model). While its speakers are being identified, deleting is greyed out; while it is being transcribed again, editing and deleting both are.
- Editing and deleting lines are free.
The buttons
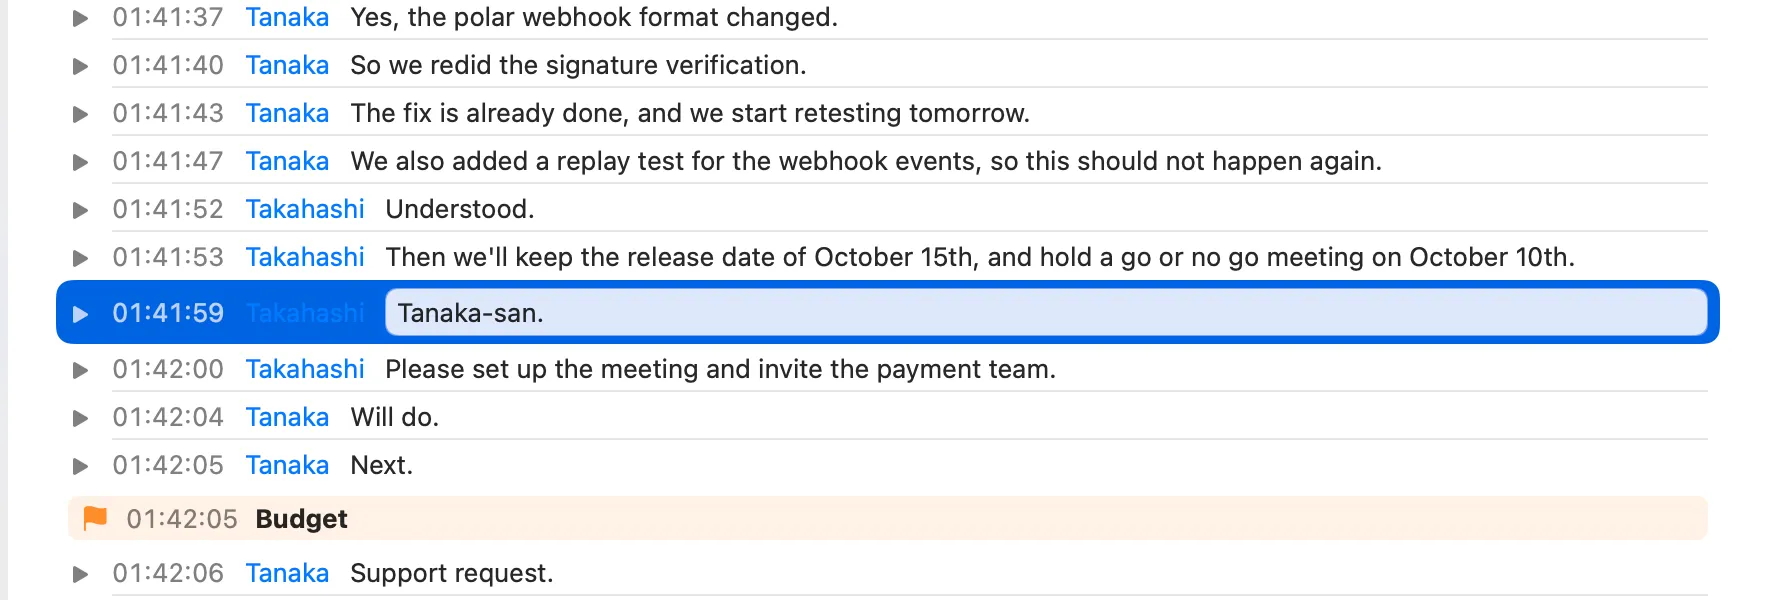
The live pane and a saved recording’s pane have the same buttons in the same places:
| Button | What it does | Key |
|---|---|---|
| Identify Speakers | Labels the lines on this Mac: S1, S2, … for app audio and M1, M2, … for the microphone (Speakers and Minutes) | — |
| Generate Minutes ▾ | Writes minutes for the range. The ▾ lists your minutes presets and Minutes Options… | ⇧⌘M |
| Show Minutes | Shows the minutes generated last | — |
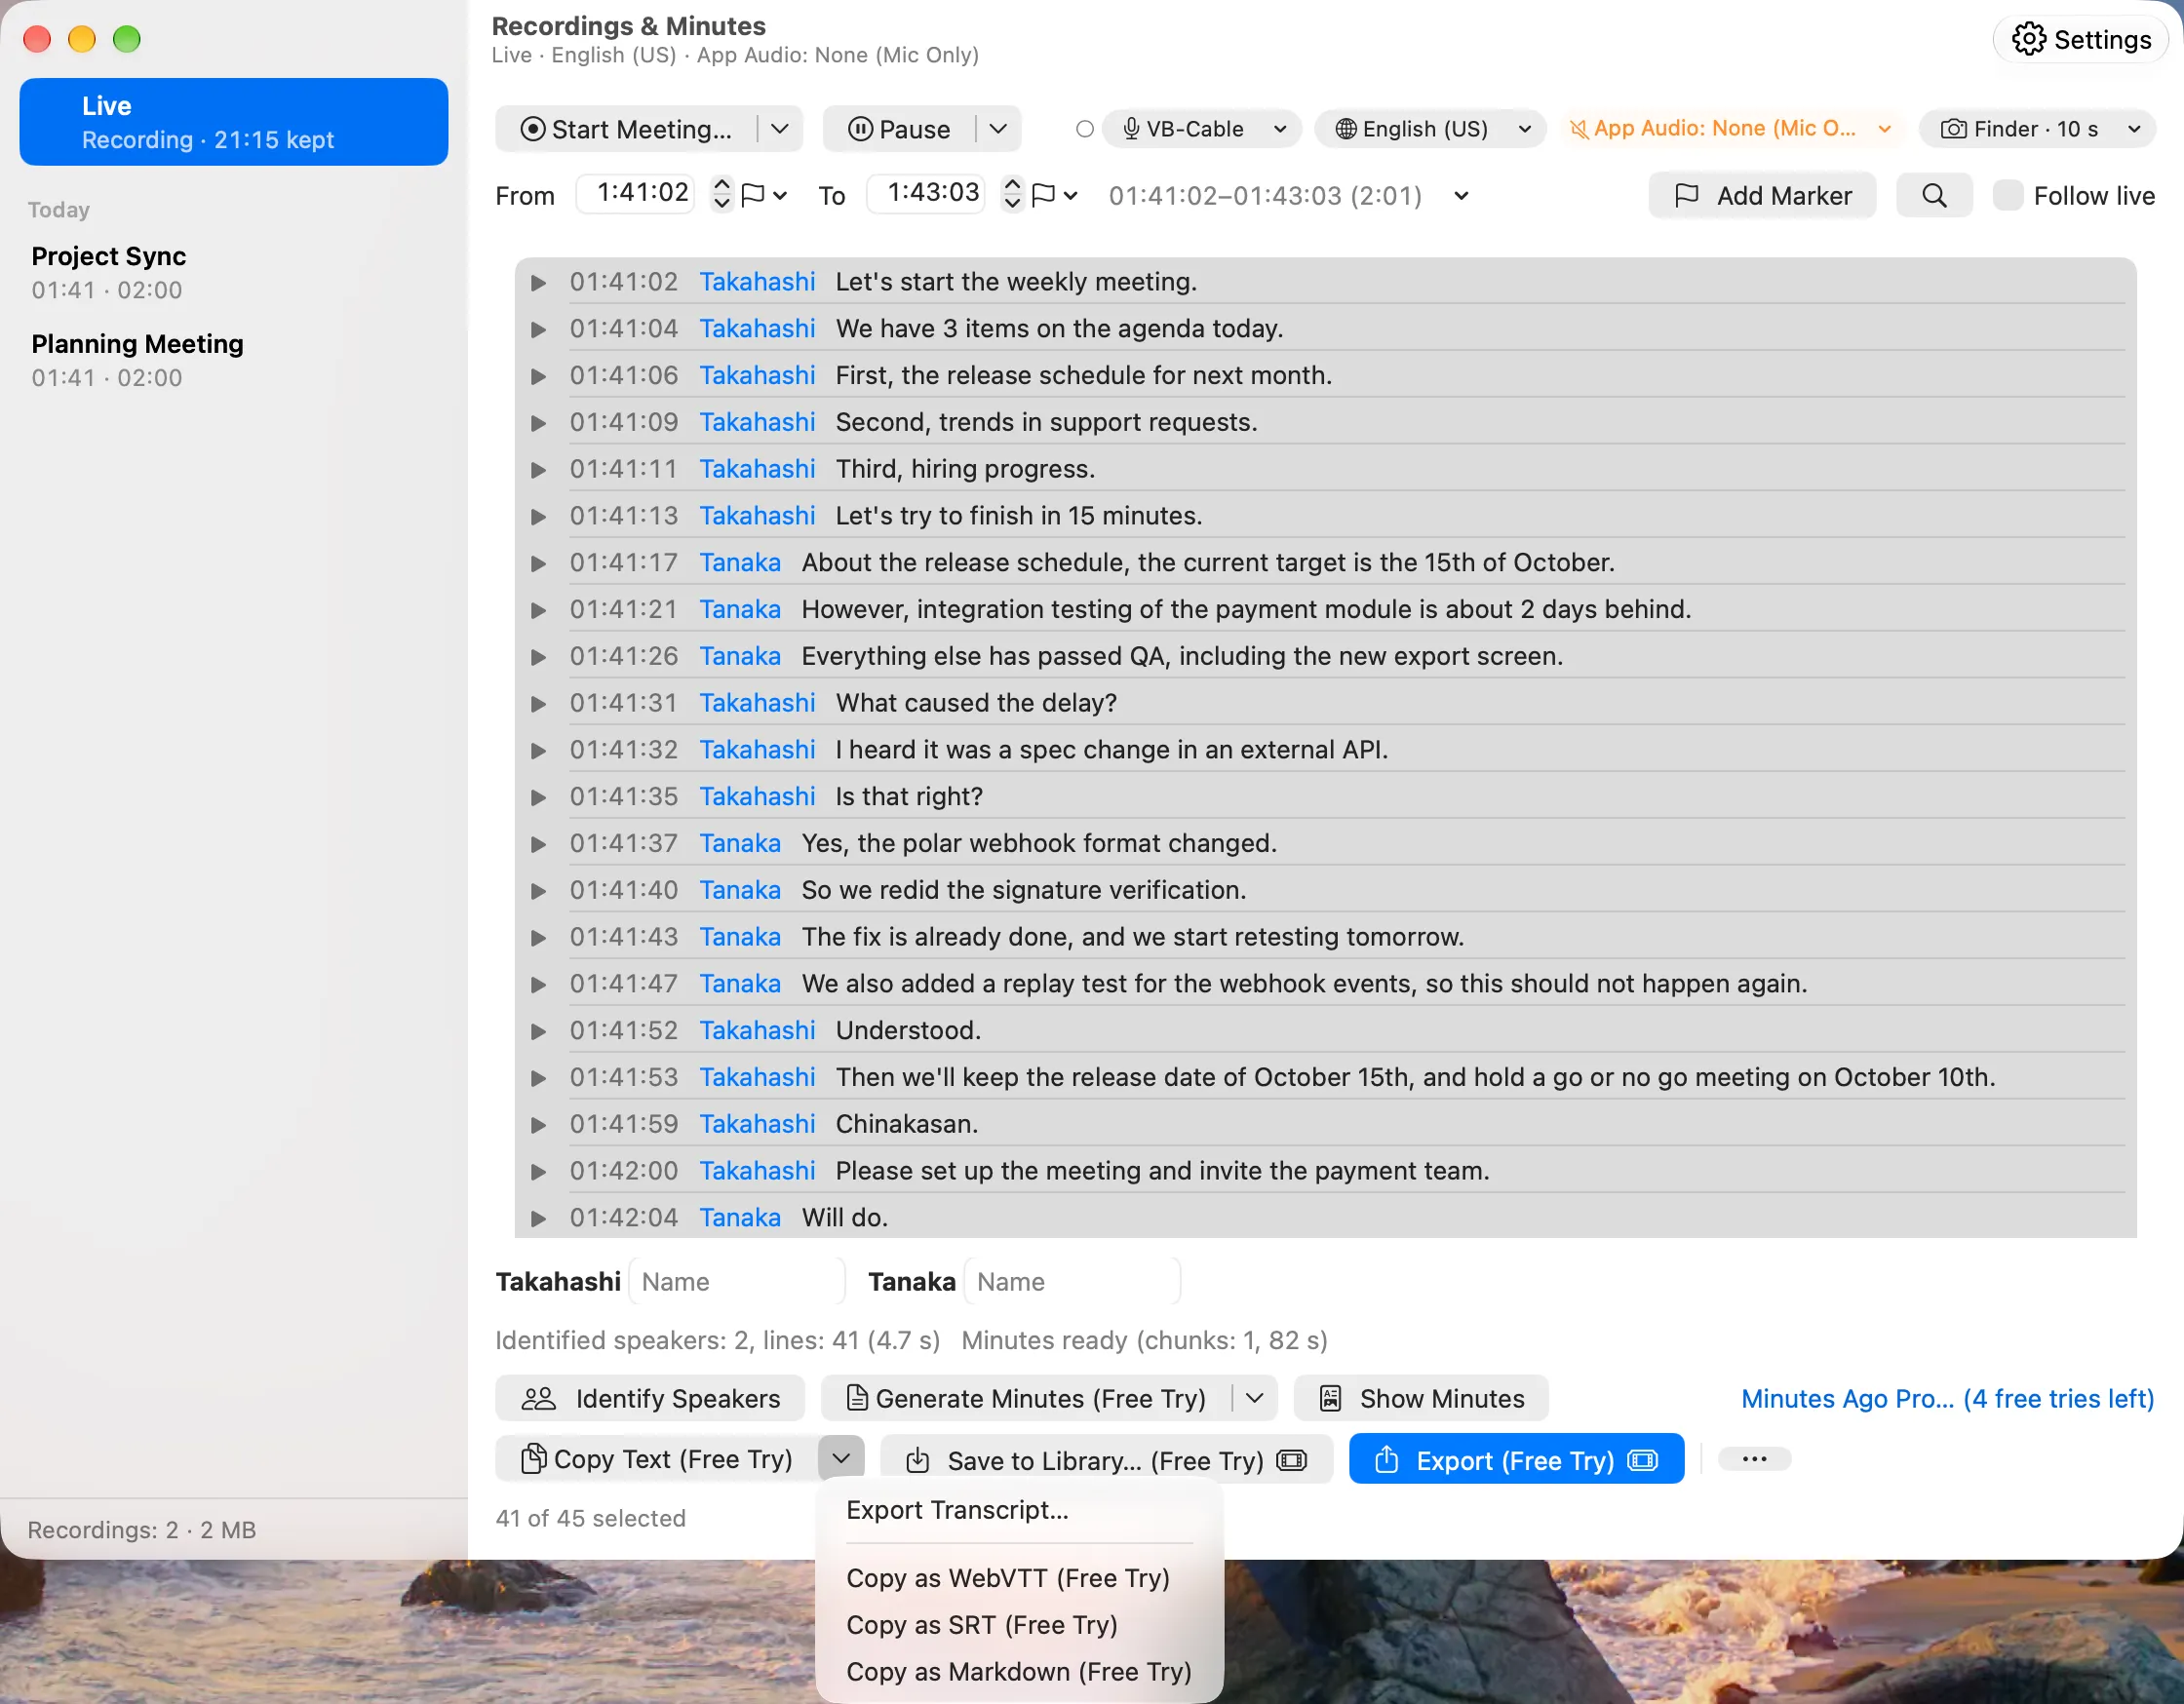
| Copy Text ▾ | Copies the transcript of the range. The ▾ has Export Transcript… and Copy as WebVTT / SRT / Markdown (Export Transcript) | ⇧⌘C |
| Save to Library… | Saves the range as a recording (Saved recordings) | ⇧⌘S |
| Export | Saves the range’s audio and transcript to your export folder | ⌘E |
| ⋯ | Include Markers, Replacements…, Minutes Settings…, Transcribe Again… (in the live pane, for the selected range; in a saved recording, for the recording), and in a saved recording Delete… | — |
Transcribe Again… in the live pane’s ⋯ transcribes the selected range again on this Mac, with the model and spoken language you choose, and replaces its lines. Its sheet starts with the range (“12:03:10–12:48:02 · 45 min”); afterwards, Undo in the status line brings the previous lines back for 8 seconds. It is free. See Transcribe again with another model.
⌘F opens the search. Greyed buttons say why next to them, for example “Select rows to use these”. A button is marked “(Free Try)” only when using it now uses a free try, and “(Pro)” (“(License)” in the direct version) when none are left (what is free).
Copy Text
Copy Text puts the transcript of the selected range on the clipboard, one line per utterance as [HH:mm:ss] speaker: text — the same as the exported .txt. Markers in the range add a line [HH:mm:ss] ⚑ name where they fall ([HH:mm:ss] ⚑ without a name). To leave them out, turn off Include Markers in ⋯.
Export
Export saves the selected range to your export folder and shows it in Finder (Exported files). The first time you export, the reminder to tell people you are recording appears once.
The File menu
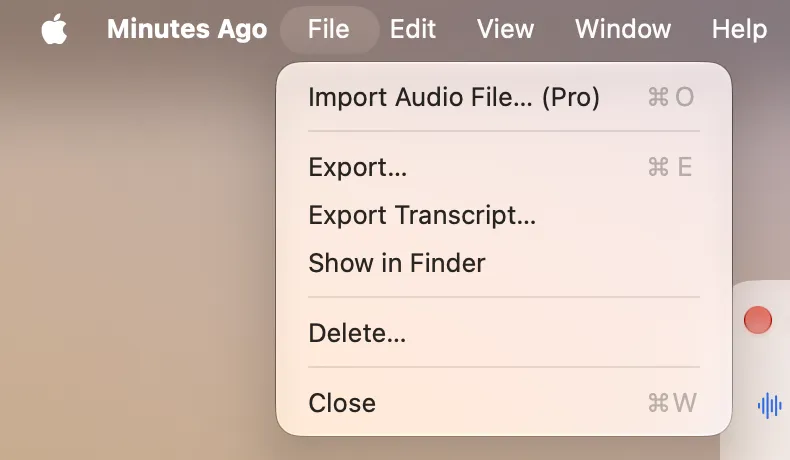
While the Dock icon is shown (The Dock icon), the menu bar has a File menu. Except for Import Audio File…, its items act on the pane you are looking at: the selected range in the live pane, or the whole recording in a saved recording’s pane.
| Item | What it does | Key |
|---|---|---|
| Import Audio File… | Imports an audio or video file as a new recording (Importing Audio Files). Before you buy, it reads Import Audio File… (Pro) (“(License)” in the direct version) | ⌘O |
| Export… | The same as the pane’s Export | ⌘E |
| Export Transcript… | Opens the Export Transcript sheet | — |
| Show in Finder | In a saved recording, shows the recording’s folder in Finder. In the live pane, shows your export folder | — |
| Delete… | Deletes the open recording after a confirmation (Renaming, exporting and deleting) | — |
- An item is greyed out when it can’t be used now: Delete… in the live pane, Show in Finder in the live pane before you choose an export folder, Export Transcript… when there are no lines, and Export… while a recording is still being transcribed from an imported file.
- When another window is in front (Settings, for example) or the Recordings & Minutes window is closed, only Import Audio File… can be chosen. It opens the window first.
- Close (⌘W) at the bottom is the standard macOS item that closes the front window.
- With Show in Dock off there is no menu bar, but ⌘O and ⌘E still work while the window is in front, and nothing is only in this menu: Show in Finder is also in a recording’s right-click menu in the left pane and, for the export folder, next to Choose… in Settings › Library.
Export Transcript
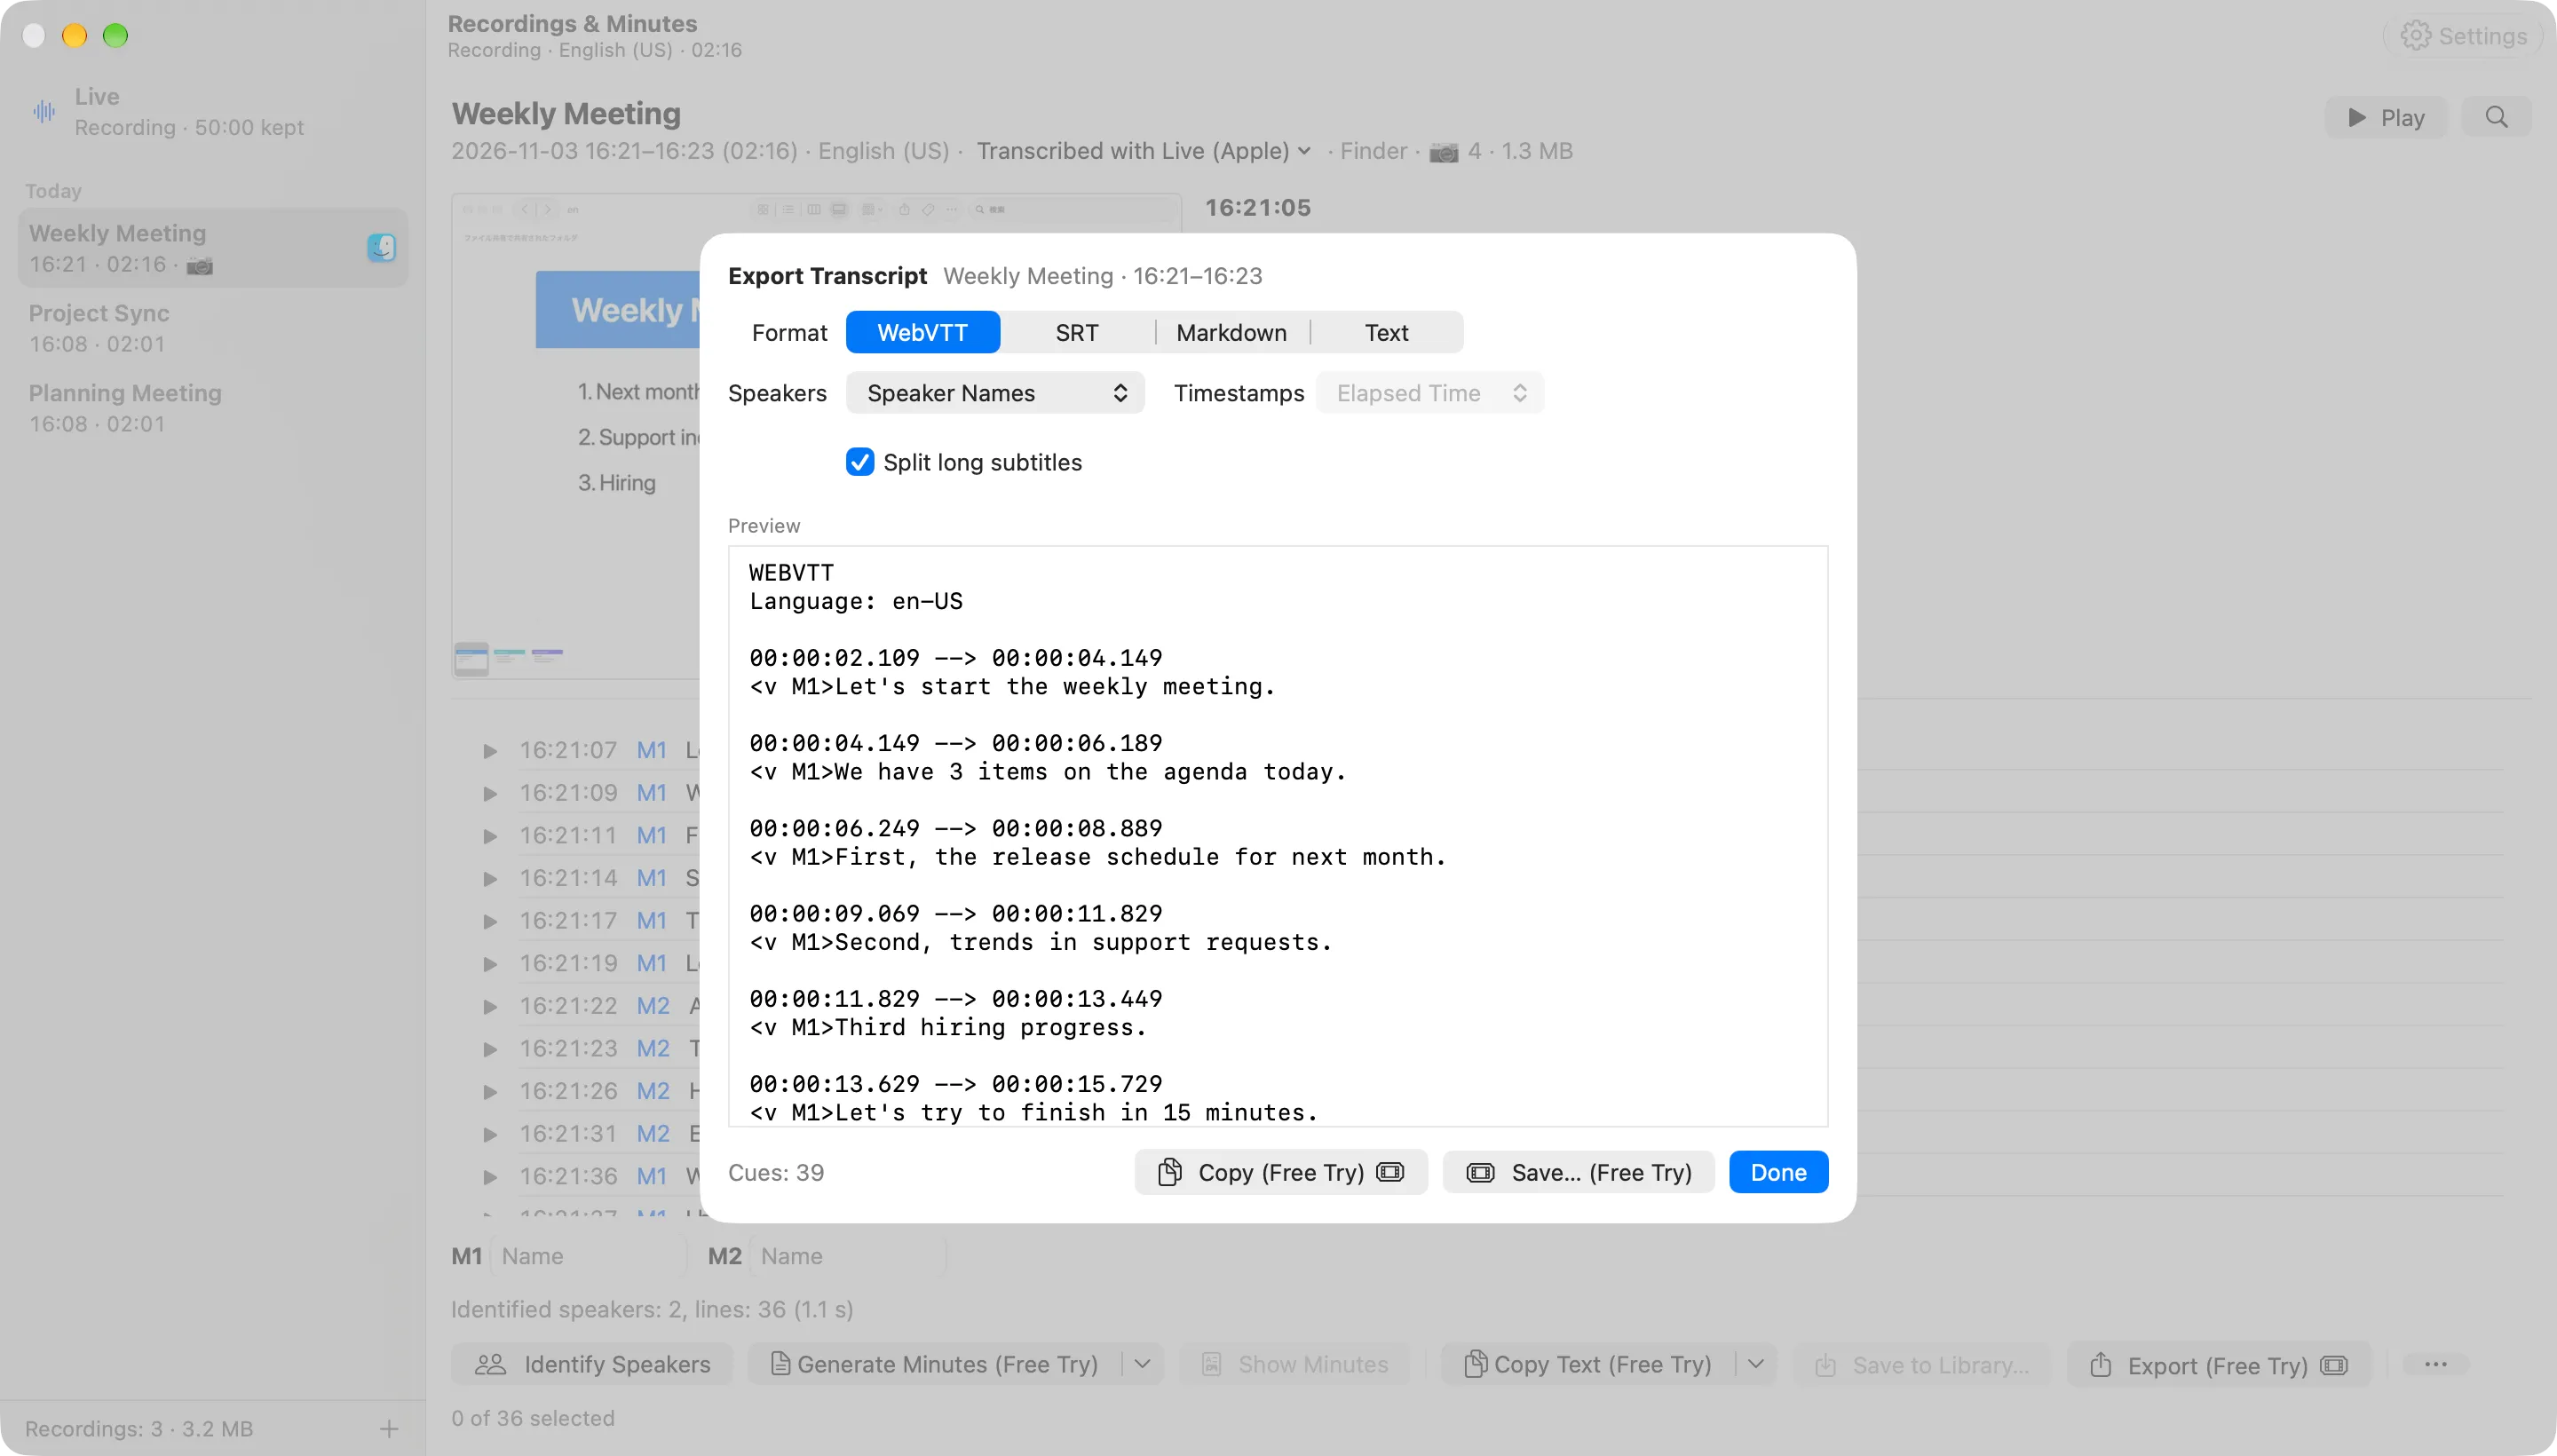
Copy Text ▾ › Export Transcript… opens a sheet for exporting the transcript as subtitles or Markdown. In a saved recording, Export Transcript… is also in the right-click menu of the recording in the left pane.
| Option | Choices |
|---|---|
| Format | WebVTT, SRT, Markdown, Text |
| Speakers | Speaker Names (S1, S2, … for app audio, M1, M2, … for the microphone, or the names you gave), Me and Others Only (microphone and app audio only), None |
| Timestamps | Elapsed Time, Time of Day, None (subtitles always use elapsed time) |
| Style (Markdown) | Paragraphs, List, Table |
| Split long subtitles | Cuts lines longer than 7 seconds or about two subtitle lines into several cues (WebVTT, SRT) |
| Merge lines of the same speaker | Joins a speaker’s lines that follow one another (Markdown, Text) |
- The preview below shows the result as you change the options.
- Copy (⌘C) copies it and turns into a checkmark; Save… (⌘S) asks where to save, starting in your export folder.
- Subtitles are timed from the start of the recording, so they line up with its exported audio. In the live pane they start at the start of the selected range.
- Your choices are remembered. Copy as WebVTT, Copy as SRT and Copy as Markdown in the ▾ copy at once with them.
- Copying and saving count like Copy Text: free for the last 30 minutes without speaker names, app audio included.
Search
You can search the transcript in the window for a word.
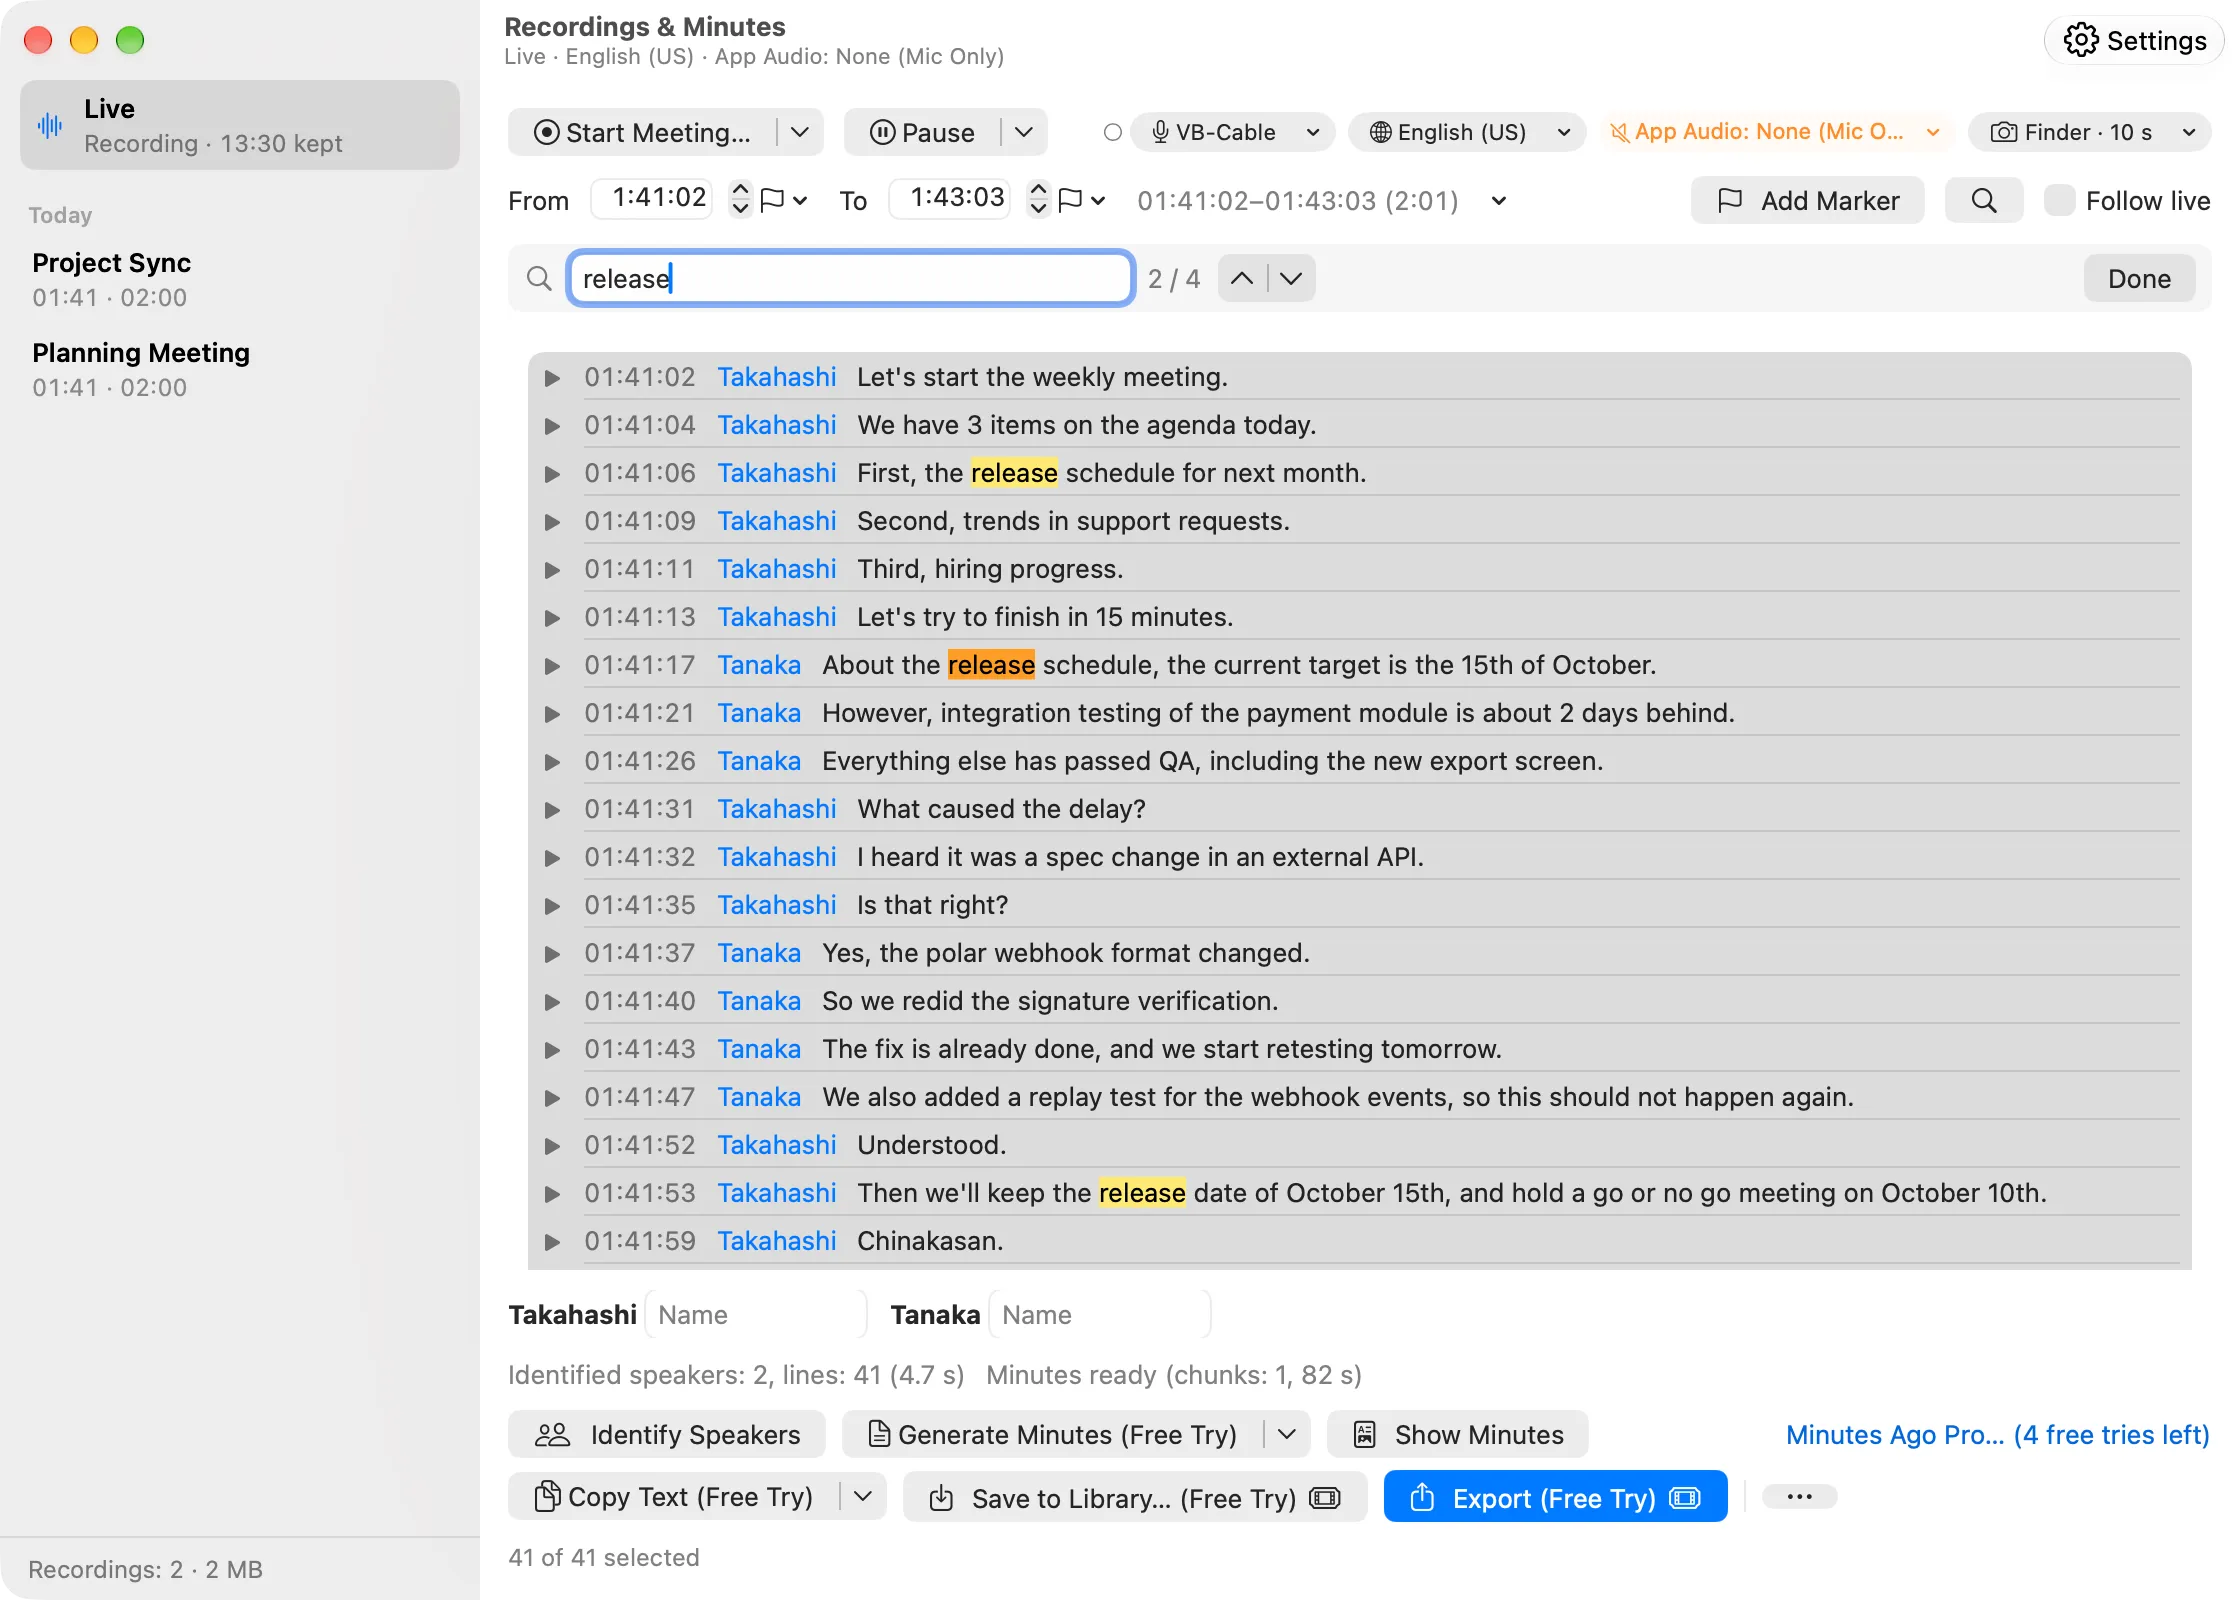
- Open — click the magnifying glass in the range bar (“Search the transcript (⌘F)”) or press ⌘F, and a search bar appears under the range bar. Pressing ⌘F again while it is open selects the text in the field.
- Find — type, and after a short pause the list moves to the first match after where you are looking (or from the top if there is none after it). Matches are highlighted in yellow and the current one in orange, and its line comes to the middle of the list.
- Count — the number of occurrences, as in “3 / 12” (a word found twice in a line counts twice). With no match it shows “Not found”.
- Next and previous — Return, ⌘G or the ⌄ button (“Next match (Return, ⌘G)”) goes to the next match; ⇧Return, ⇧⌘G or the ⌃ button (“Previous match (⇧Return, ⇧⌘G)”) to the previous one. After the last match it goes back to the first.
- Close — Esc or Done. The word stays; the next time you open the bar with ⌘F, its matches are highlighted again.
A saved recording’s pane has the magnifying glass at the right of its header (recordings made from an imported audio file too).
What matches
- Upper and lower case, full-width and half-width characters, and hiragana and katakana are treated as the same.
- Accents and Japanese voicing marks are not ignored (“café” does not find “cafe”, and がっこう does not find かっこう).
- Spaces before and after the word are ignored. A phrase with spaces is searched as it is. There are no regular expressions and no search for lines containing several words.
- Only the text shown in the list is searched (after the replacement dictionary). Speaker names and times are not.
- The whole list is searched, not just the selected range. Search is free and also finds lines older than 30 minutes.
The range does not change
Moving to a match does not select its line, so the range (From and To) stays as it is. Moving to a match turns off Follow live. While recording, the count is updated as lines are added or expire.
Markers
During a meeting, you can mark a moment you will want to come back to. Markers appear in the list, can be used as range ends, and go into exported files, copied text and minutes.
Adding a marker
Markers are added at the moment you add them, while recording. You can add one in these ways:
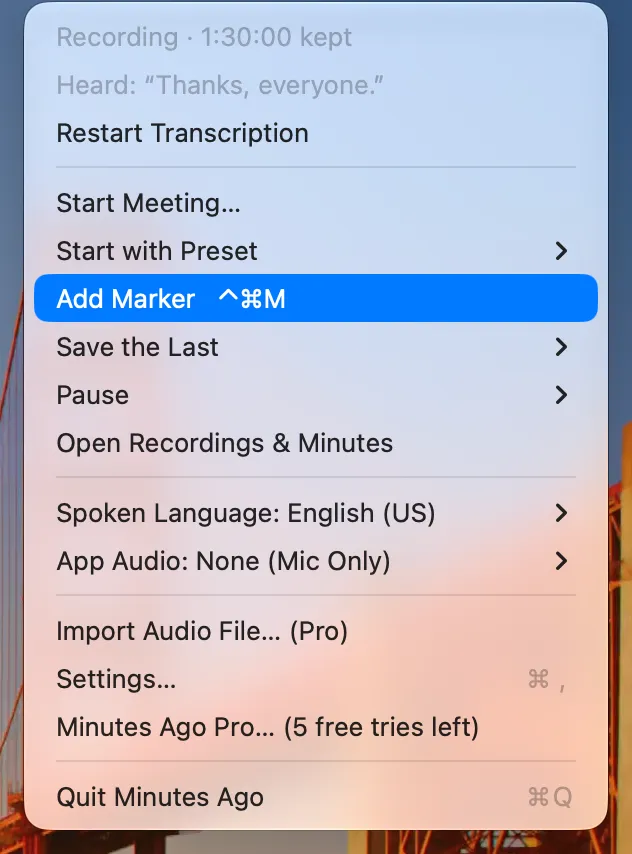
- Menu — Add Marker (shown only while recording). Holding ⌥ (Option) turns it into Add Marker with Name…, which opens a small window for the name (the time is when you chose the menu item; Cancel adds nothing).
- A key from any app — set a key for Add Marker in Settings › Keyboard (none by default), and it adds a marker while recording, whichever app you are using. When not recording, the key beeps (Agents and Shortcuts).
- Shortcuts app and agents — the Add Marker action (name optional), “Add a marker in Minutes Ago” from Siri or Spotlight,
add_marker(MCP) andminutesago marker add(the direct version’s command-line tool) (Agents and Shortcuts). When not recording, they fail with “Not recording. Markers can be added while Minutes Ago is recording.” - The window — Add Marker in the range bar (just a flag when the window is narrow).
- Right-click a line — Add Marker Here adds a marker at the start of that line. This one also works when you are not recording.
When a marker is added, the menu bar icon turns into a flag for 1.5 seconds. No sound is played, so nothing ends up in the meeting recording.
Markers in the list
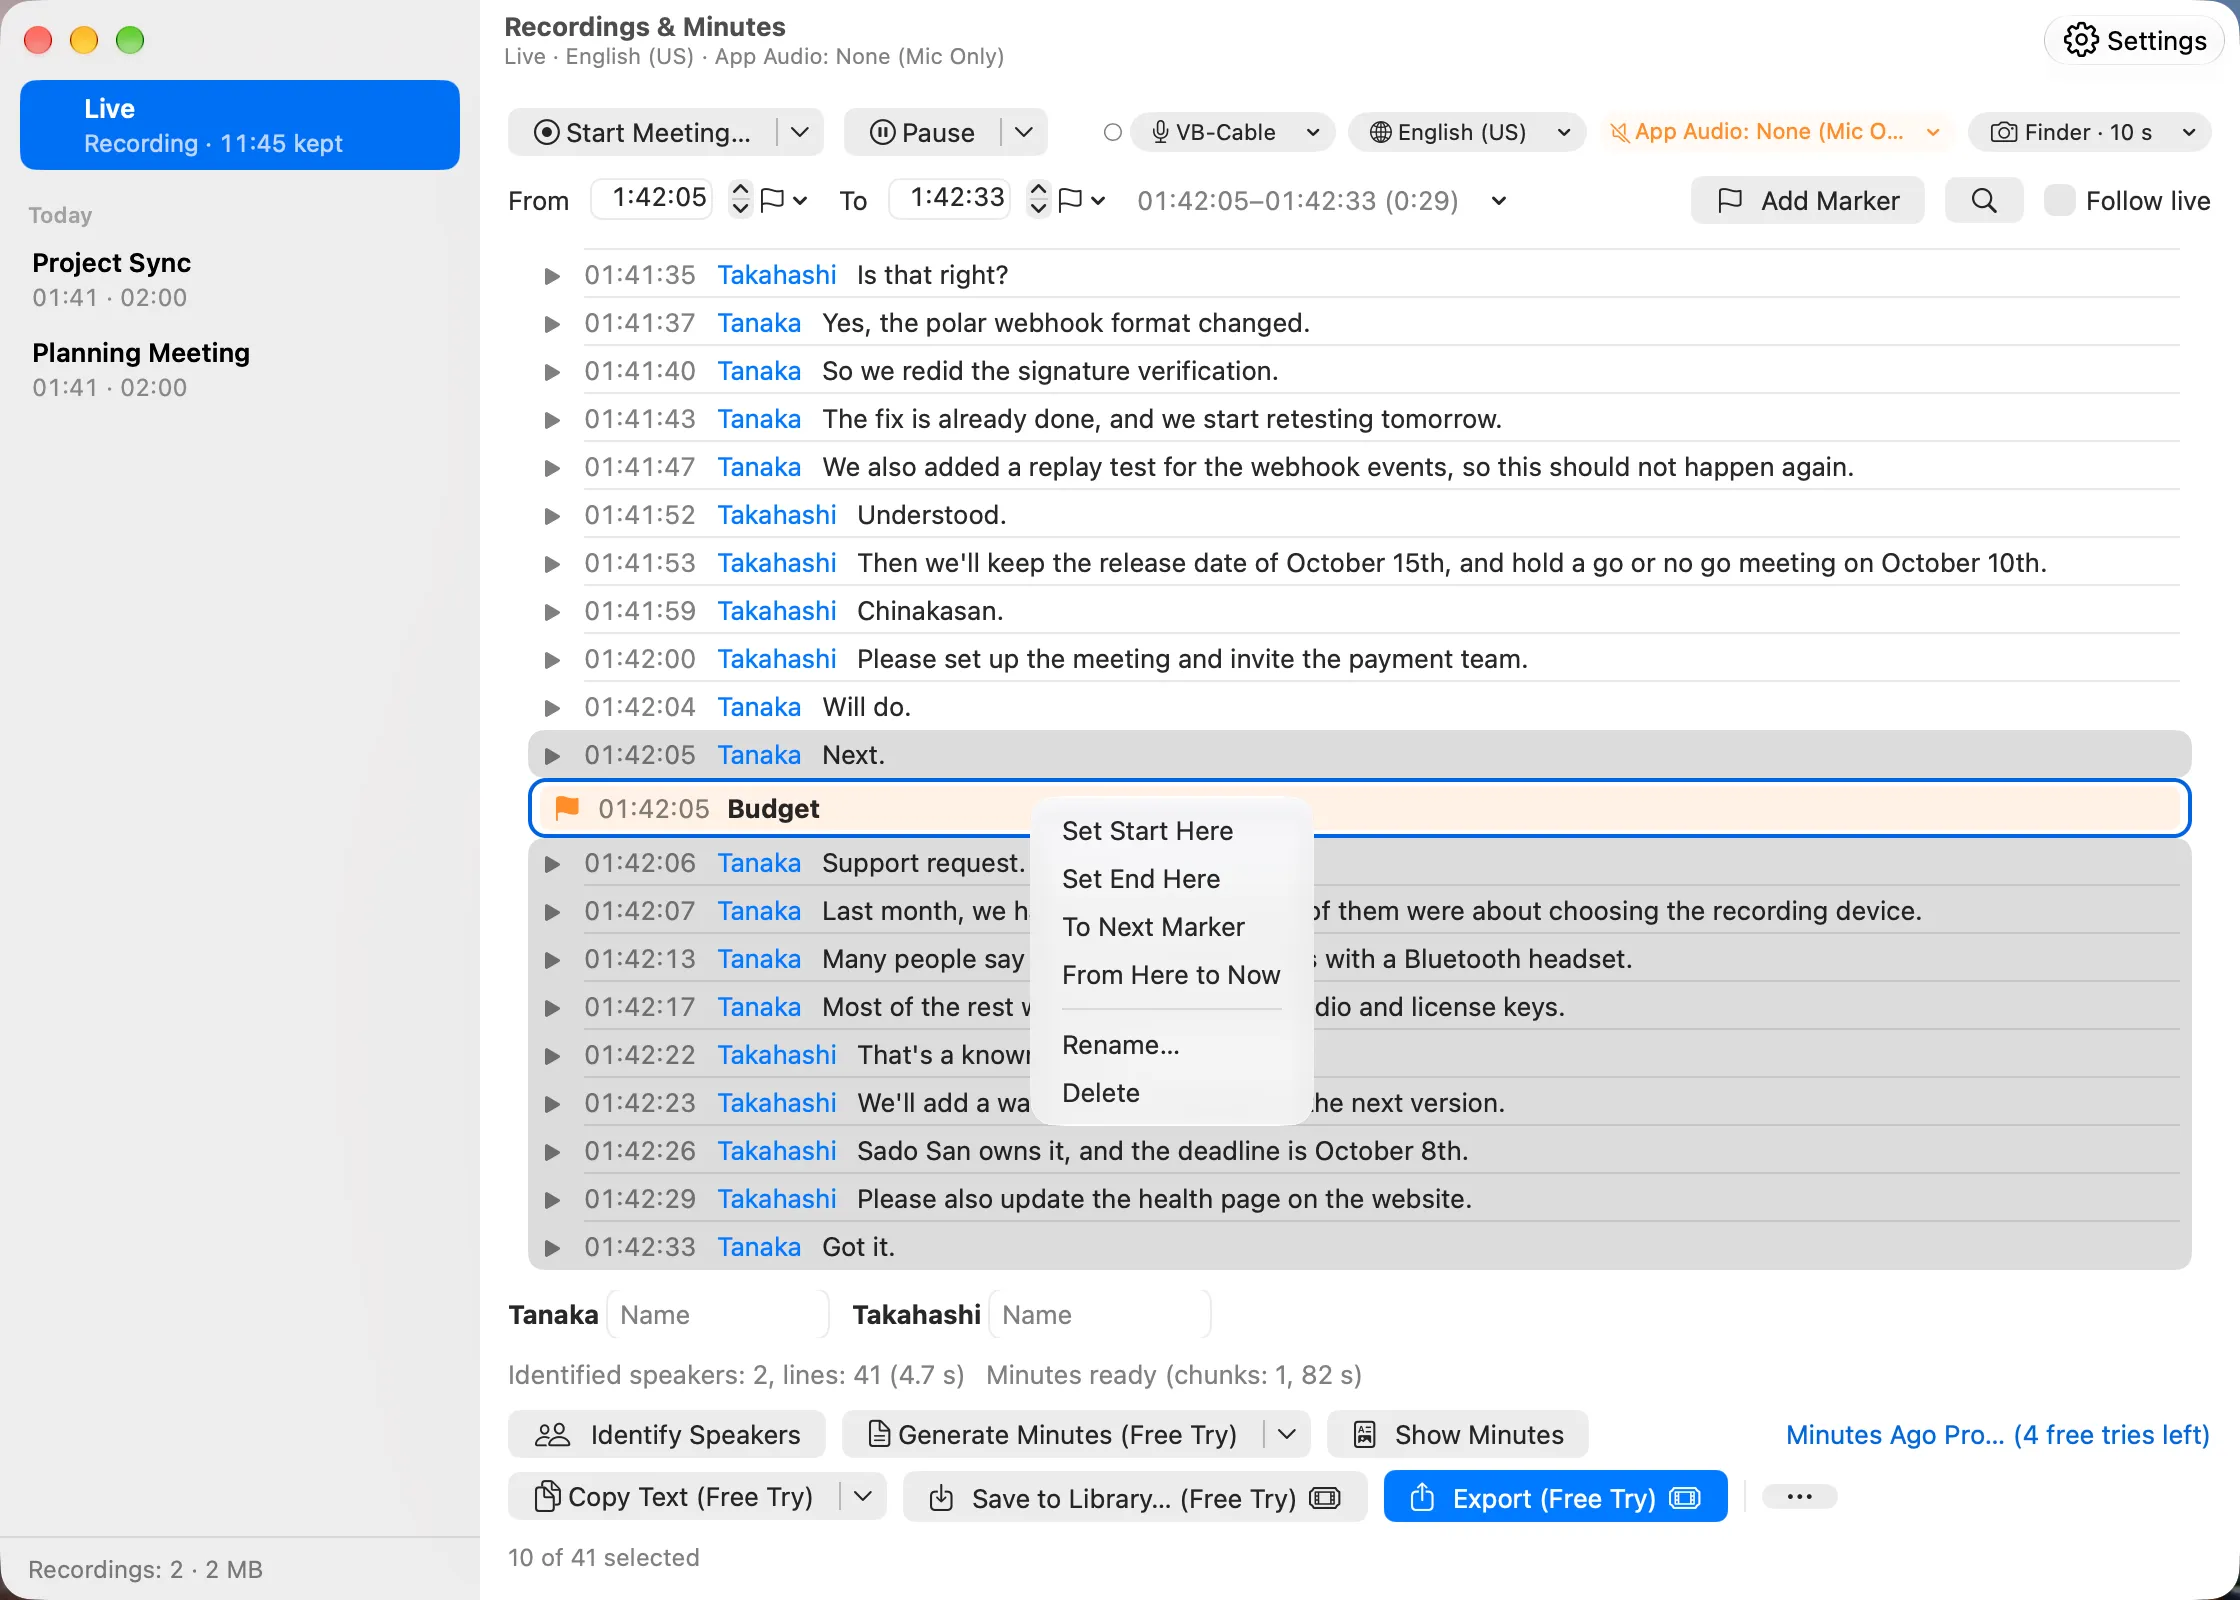
Markers appear between the lines in time order, as rows with a light orange band. Each shows a flag, its time and its name, or a grey “Add Name” when it has none.
- Click the name (or “Add Name”) to open the Marker Name sheet. A name is one line of up to 100 characters.
- Marker rows cannot be selected. Clicking one does not change the range.
- Markers added from the menu or a key appear in the list within 3 seconds.
Making a range from markers
Right-click a marker row for these items:
| Item | What it does |
|---|---|
| Set Start Here | Sets the start to the marker. The end stays (if the end is at or before the marker, the end becomes now) |
| Set End Here | Sets the end to the marker. The start stays (if the start is at or after the marker, the start becomes the marker before it, or the beginning of the live audio if there is none) |
| To Next Marker | From this marker to the next one (or to now if there is none) |
| From Here to Now | From this marker to now |
| Rename… | Opens the Marker Name sheet |
| Delete | Deletes the marker |
The flag buttons next to the From and To times (“Start at a marker”, “End at a marker”) list the markers by time and name (for example 14:12:40 Budget); choosing one moves that end of the range to it. Since the Last Marker in the ▾ after the range runs from the last marker to now.
When you make a range from a marker, the list moves to that marker row and Follow live turns off.
Renaming and deleting
- Rename a marker by clicking its name or with Rename… in the right-click menu. A name of only spaces leaves the marker unnamed.
- Delete removes it without asking, and the status line shows “Marker deleted” with Undo for 8 seconds. Undo brings it back.
- A marker’s time cannot be moved. Delete it and add a new one instead (Add Marker Here on a line adds one at an earlier time).
Retention and price
- Markers expire with the audio and transcripts after Keep the last, and Erase Live Audio… deletes them too. In a saved recording they stay with it.
- Adding, naming and deleting markers and making a range from them are free. Taking out the range works as before (a range older than 30 minutes needs Minutes Ago Pro or a free try; see Pricing).
Meetings
A meeting marks the stretch from when it starts to when it stops, like a voice recorder, while recording stays always on underneath. While it runs, nothing from its start is deleted (up to 24 hours), and when it stops it is kept as a saved recording.
Starting a meeting
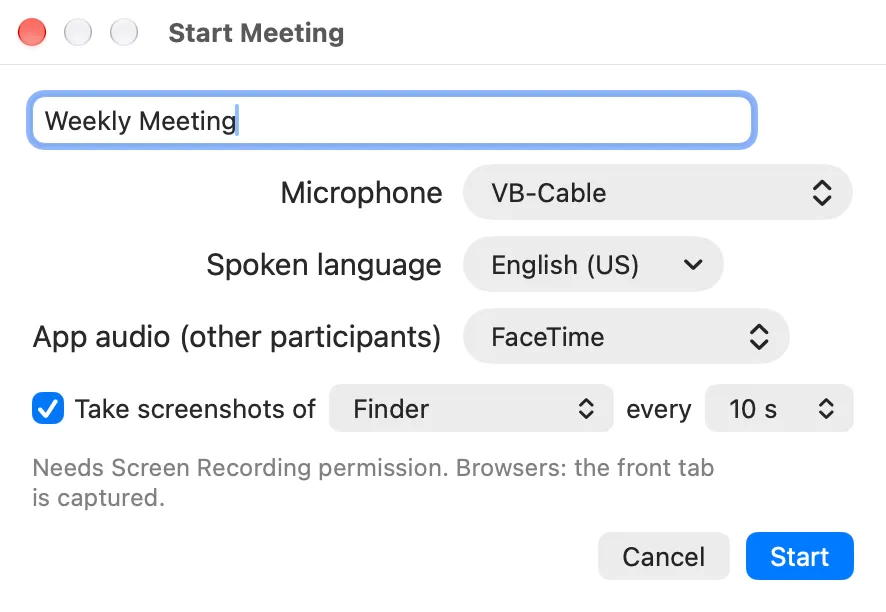
Start Meeting… in the menu, or in the meeting bar of the window, opens the Start Meeting window:
- Name (optional). A meeting without a name is named with its date and time.
- Microphone, Spoken language and App audio (other participants) — the window opens with your settings; what you choose here becomes your setting.
- Take screenshots of — an app and every 3, 5, 10, 20, 30 or 60 seconds (Screenshots). Off until you turn it on.
Start (Return) starts the meeting. Start Meeting with ⌥ in the menu, and Start Meeting in the ▾ beside Start Meeting… in the window, start at once with the last settings. You can also start one with a key from any app (Settings › Keyboard) or from the Shortcuts app and agents; then a short notice such as “Meeting started · English (US) · Teams” appears at the top of the screen. A meeting can start only while recording.
During a meeting
- The menu’s first line becomes “● name · elapsed time · 📷 n”, and the window’s meeting bar shows the name and the clock, with Pause (Pausing a meeting).
- In the list, a meeting row marks its start. Double-click it, or right-click it and choose Select This Meeting, to make the whole meeting the range. This Meeting in the ▾ does the same.
- The live audio of a meeting is written to the SSD, so a crash loses at most the last 30 seconds (Data and Privacy).
Pausing a meeting
When part of a meeting must not be recorded (a break, a private aside), pause the meeting instead of stopping it.
- Pause it with Pause in the meeting bar, Pause Meeting in the menu, a key you set for Pause / Resume Meeting in Settings › Keyboard, the Pause Meeting action in the Shortcuts app, or an agent (
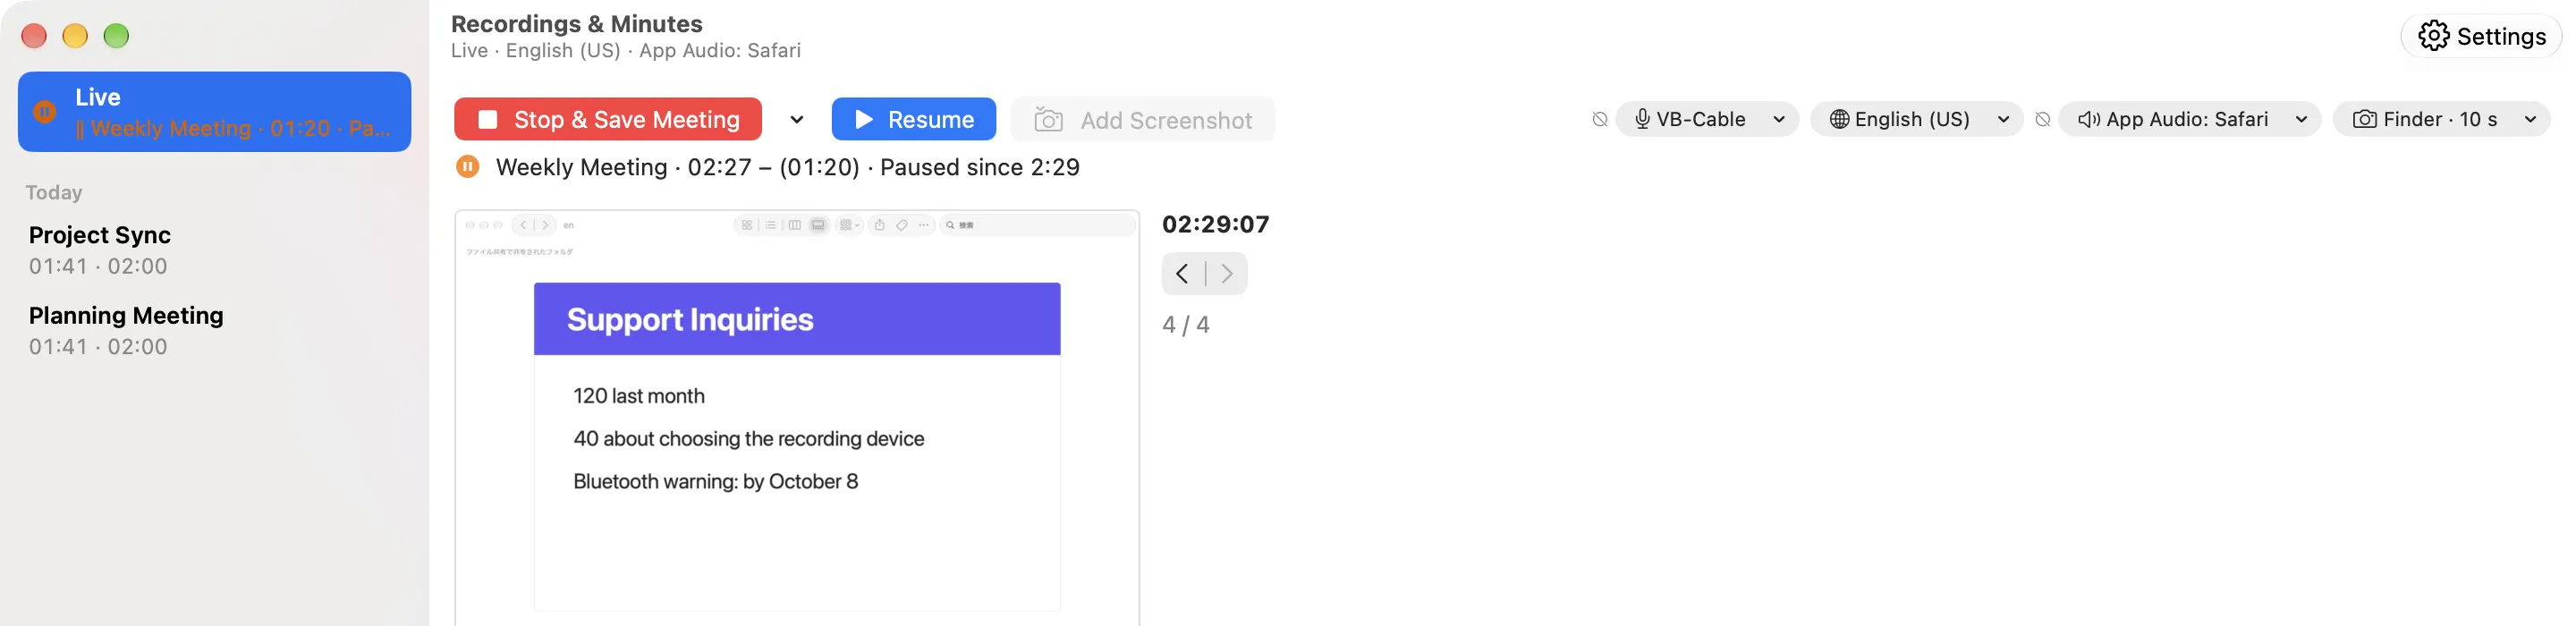
pause_meeting, andminutesago meeting pausein the direct version). Resume it the same way: Resume in the bar, Resume Meeting in the menu, the same key, Resume Meeting,resume_meetingorminutesago meeting resume. - While it is paused, nothing is recorded (the always-on recording doesn’t keep it either), no screenshots are taken, and the meeting’s clock stops. The menu bar icon shows the pause symbol, the menu’s first line reads “‖ name · 23:15 · Paused”, and the bar “Paused since 10:40”.
- Add Marker and Add Screenshot don’t work while it is paused (“Meeting is paused”).
- It stays paused after a restart, until you resume it.
- The saved recording has the markers “Meeting paused” and “Meeting resumed” where you paused and resumed.
- A meeting’s pause has no set time: during a meeting, the menu shows Pause Meeting instead of Pause ▸.
- Pausing and resuming are free.
Stopping and saving
Stop & Save Meeting in the menu or in the meeting bar ends the meeting and saves it as a recording, without asking. Afterwards the bar shows “Saved: name · 23:15” with Generate Minutes and Open Recording, and the menu’s second line offers to open it for 10 minutes.
- Discard Meeting… (⌥ in the menu, or in the bar) ends it without saving, after a confirmation. The audio and transcript stay in live audio until they are older than Keep the last; only the meeting and its screenshots are removed.
- A meeting shorter than 5 seconds is not saved.
- Saving counts like an export: free when the meeting is within the last 30 minutes and has no speaker names (app audio included); otherwise it uses a free try (or needs Pro).
Presets and “this meeting only”
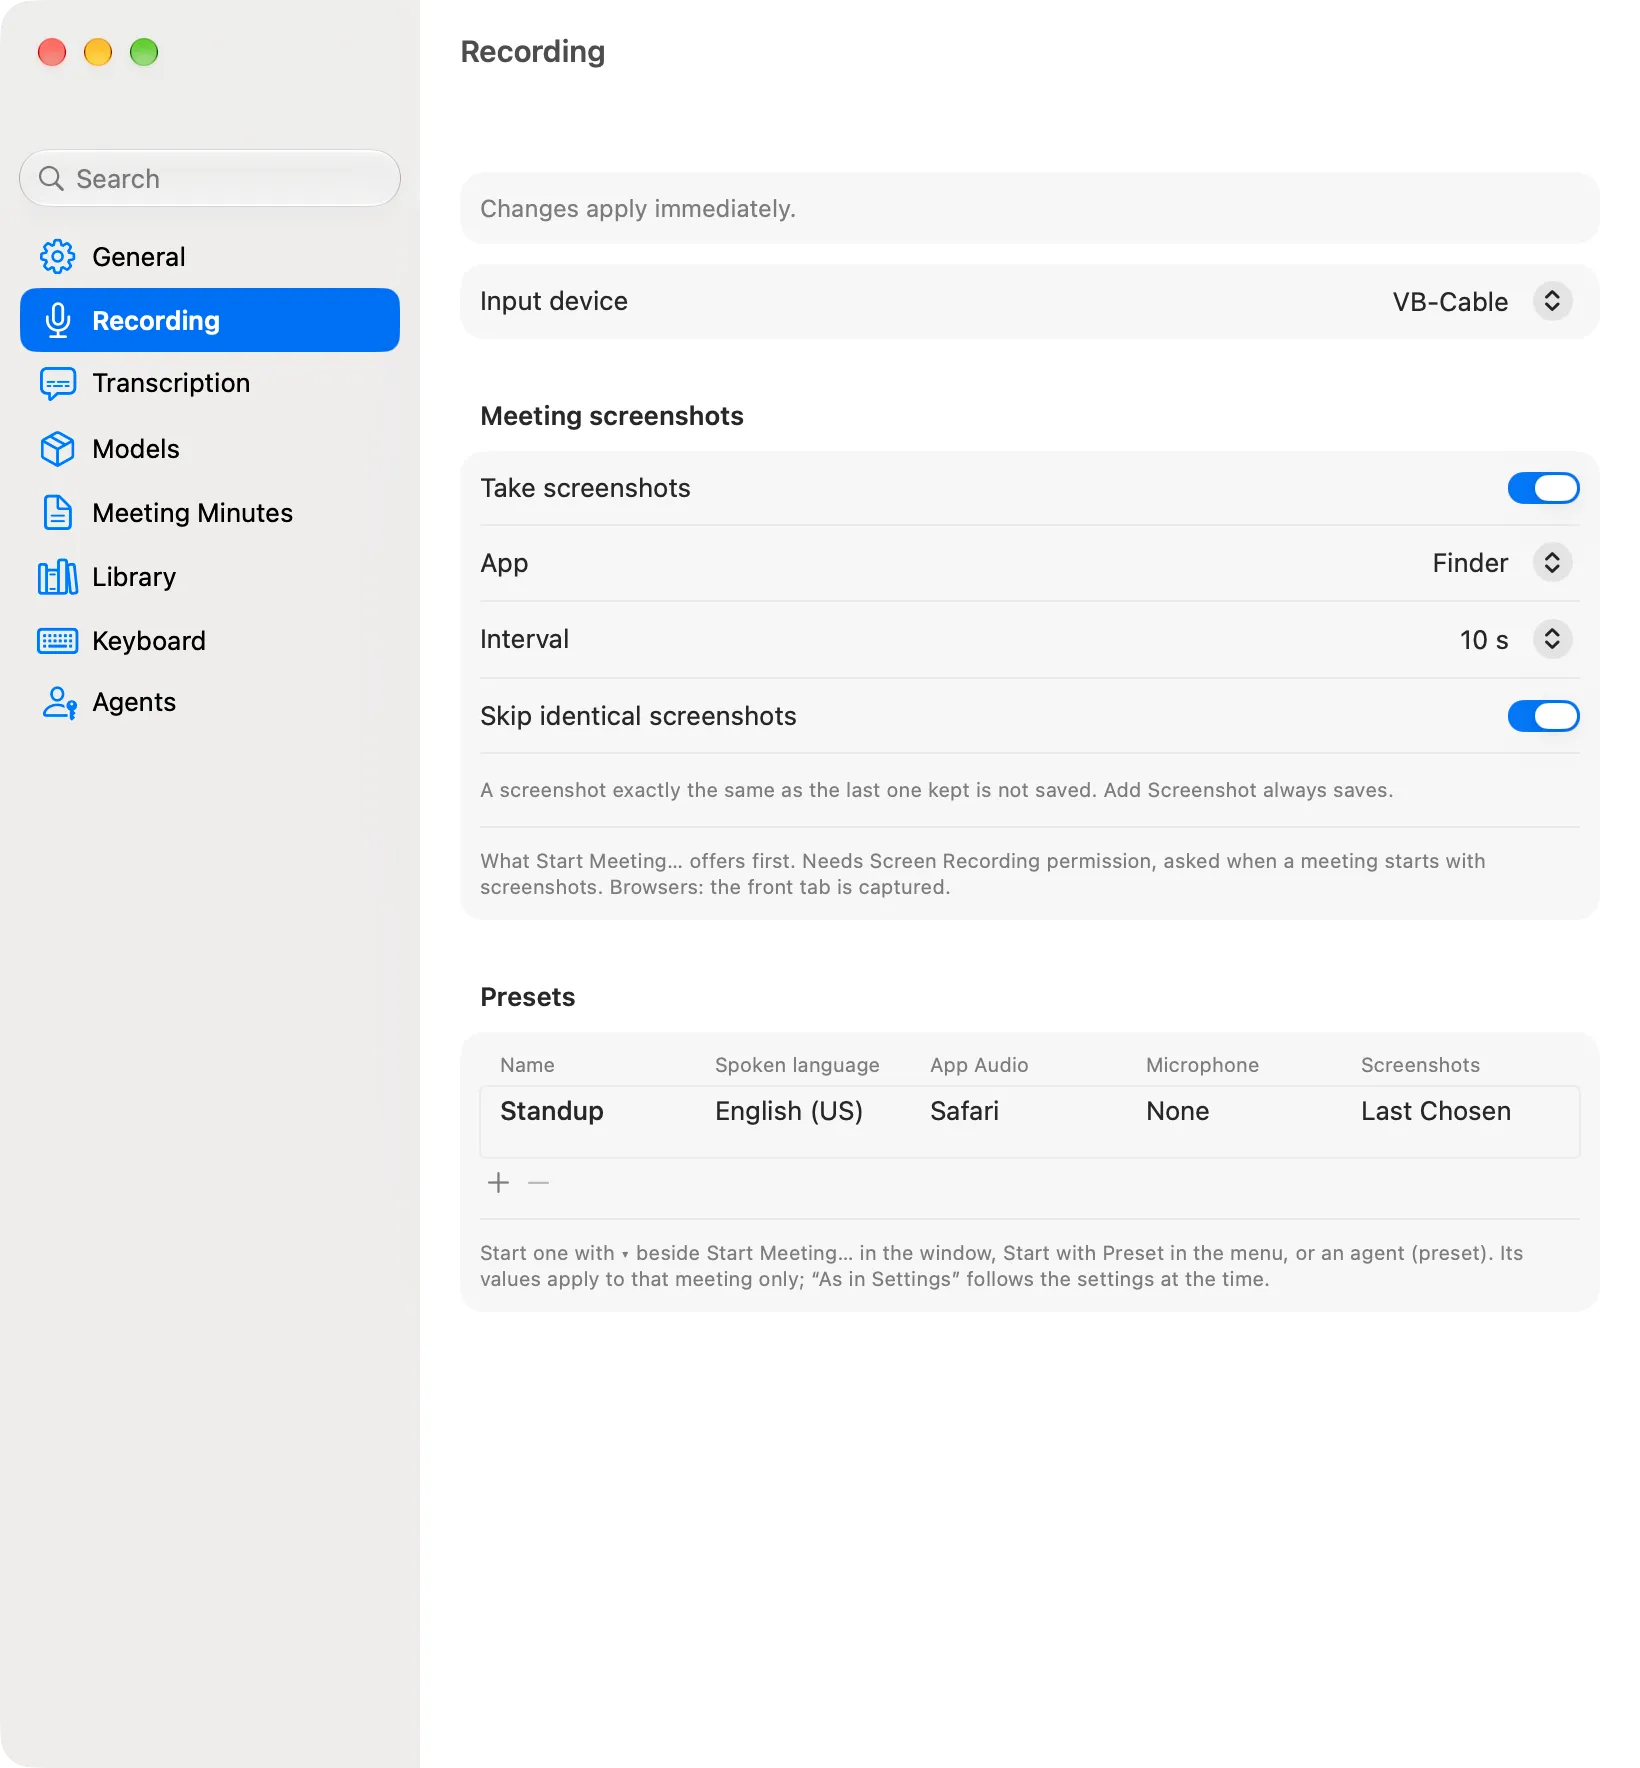
For meetings you have often, save their conditions as presets in Settings › Recording › Presets: a name with the spoken language, App Audio, microphone and screenshots, each of which can stay “As in Settings”. Start one with Start with Preset ▸ in the menu (shown once you have a preset) or the ▾ beside Start Meeting… in the window (the presets are listed under Start Meeting).
A preset’s values are for that meeting only and don’t change your settings. While such a meeting runs, the menu, the chips and the window’s subtitle mark them “(this meeting only)”. Stop & Save Meeting or Discard Meeting goes back to your settings; choosing a value in the menu, a chip or Settings makes it your setting again. Agents and the Shortcuts app can also start a meeting with its own language, App Audio and microphone (Agents and Shortcuts).
Quitting and restarting during a meeting
Quitting Minutes Ago during a meeting asks once: Stop & Save Meeting saves it before quitting, Keep (resumes at next launch) leaves it running, and Cancel doesn’t quit. A meeting left running resumes at the next launch, with “Resumed from … (before the restart)” in the bar.
Screenshots
During a meeting, Minutes Ago can take screenshots of one app’s window (for example your video call), so the slides and figures shown on screen stay with the transcript.
Turning them on
- In the Start Meeting window, turn on Take screenshots of, choose the app and an interval (3 to 60 seconds). The 📷 chip and Settings › Recording › Meeting screenshots set what the window offers next time.
- The first time, macOS asks for the Screen Recording permission. It is asked only when you start a meeting yourself from the window or the menu, never by a key or an agent. If it is not allowed, the meeting starts without screenshots.
- Only that app’s window is captured, never the whole screen or other apps. In a browser, the front tab is captured.
- While screenshots are being taken, the menu bar icon shows a red dot and the menu shows how many there are.
What is kept
- Only screenshots that changed are kept. With Skip identical screenshots (Settings › Recording › Meeting screenshots, on by default), a screenshot exactly the same as the last one kept is not saved, so a still screen no longer adds one every minute. A change applies at once, also to the meeting in progress.
- A screen with a running clock (a meeting timer, for example) changes every time, so it is kept as before.
- Discarding the meeting deletes its screenshots. Stopping and saving moves them into the recording.
Add Screenshot
To keep the screen right now, before the next screenshot is due, use Add Screenshot: in the meeting bar of the window, in the menu, or with a key set in Settings › Keyboard (the app you are in stays in front). It is kept even when the screen has not changed. The menu bar icon shows a camera for a moment; no sound is played. The regular interval stays as it is. Add Screenshot works only during a meeting with screenshots.
Seeing them
When a meeting or a saved recording has screenshots, they appear above the list. The one shown is the screenshot at the time of the topmost line in view (the latest while following live), so it changes as you scroll. ◀ ▶ step through them with their time and “n / N”; click a screenshot to see it at full size (Esc closes it).
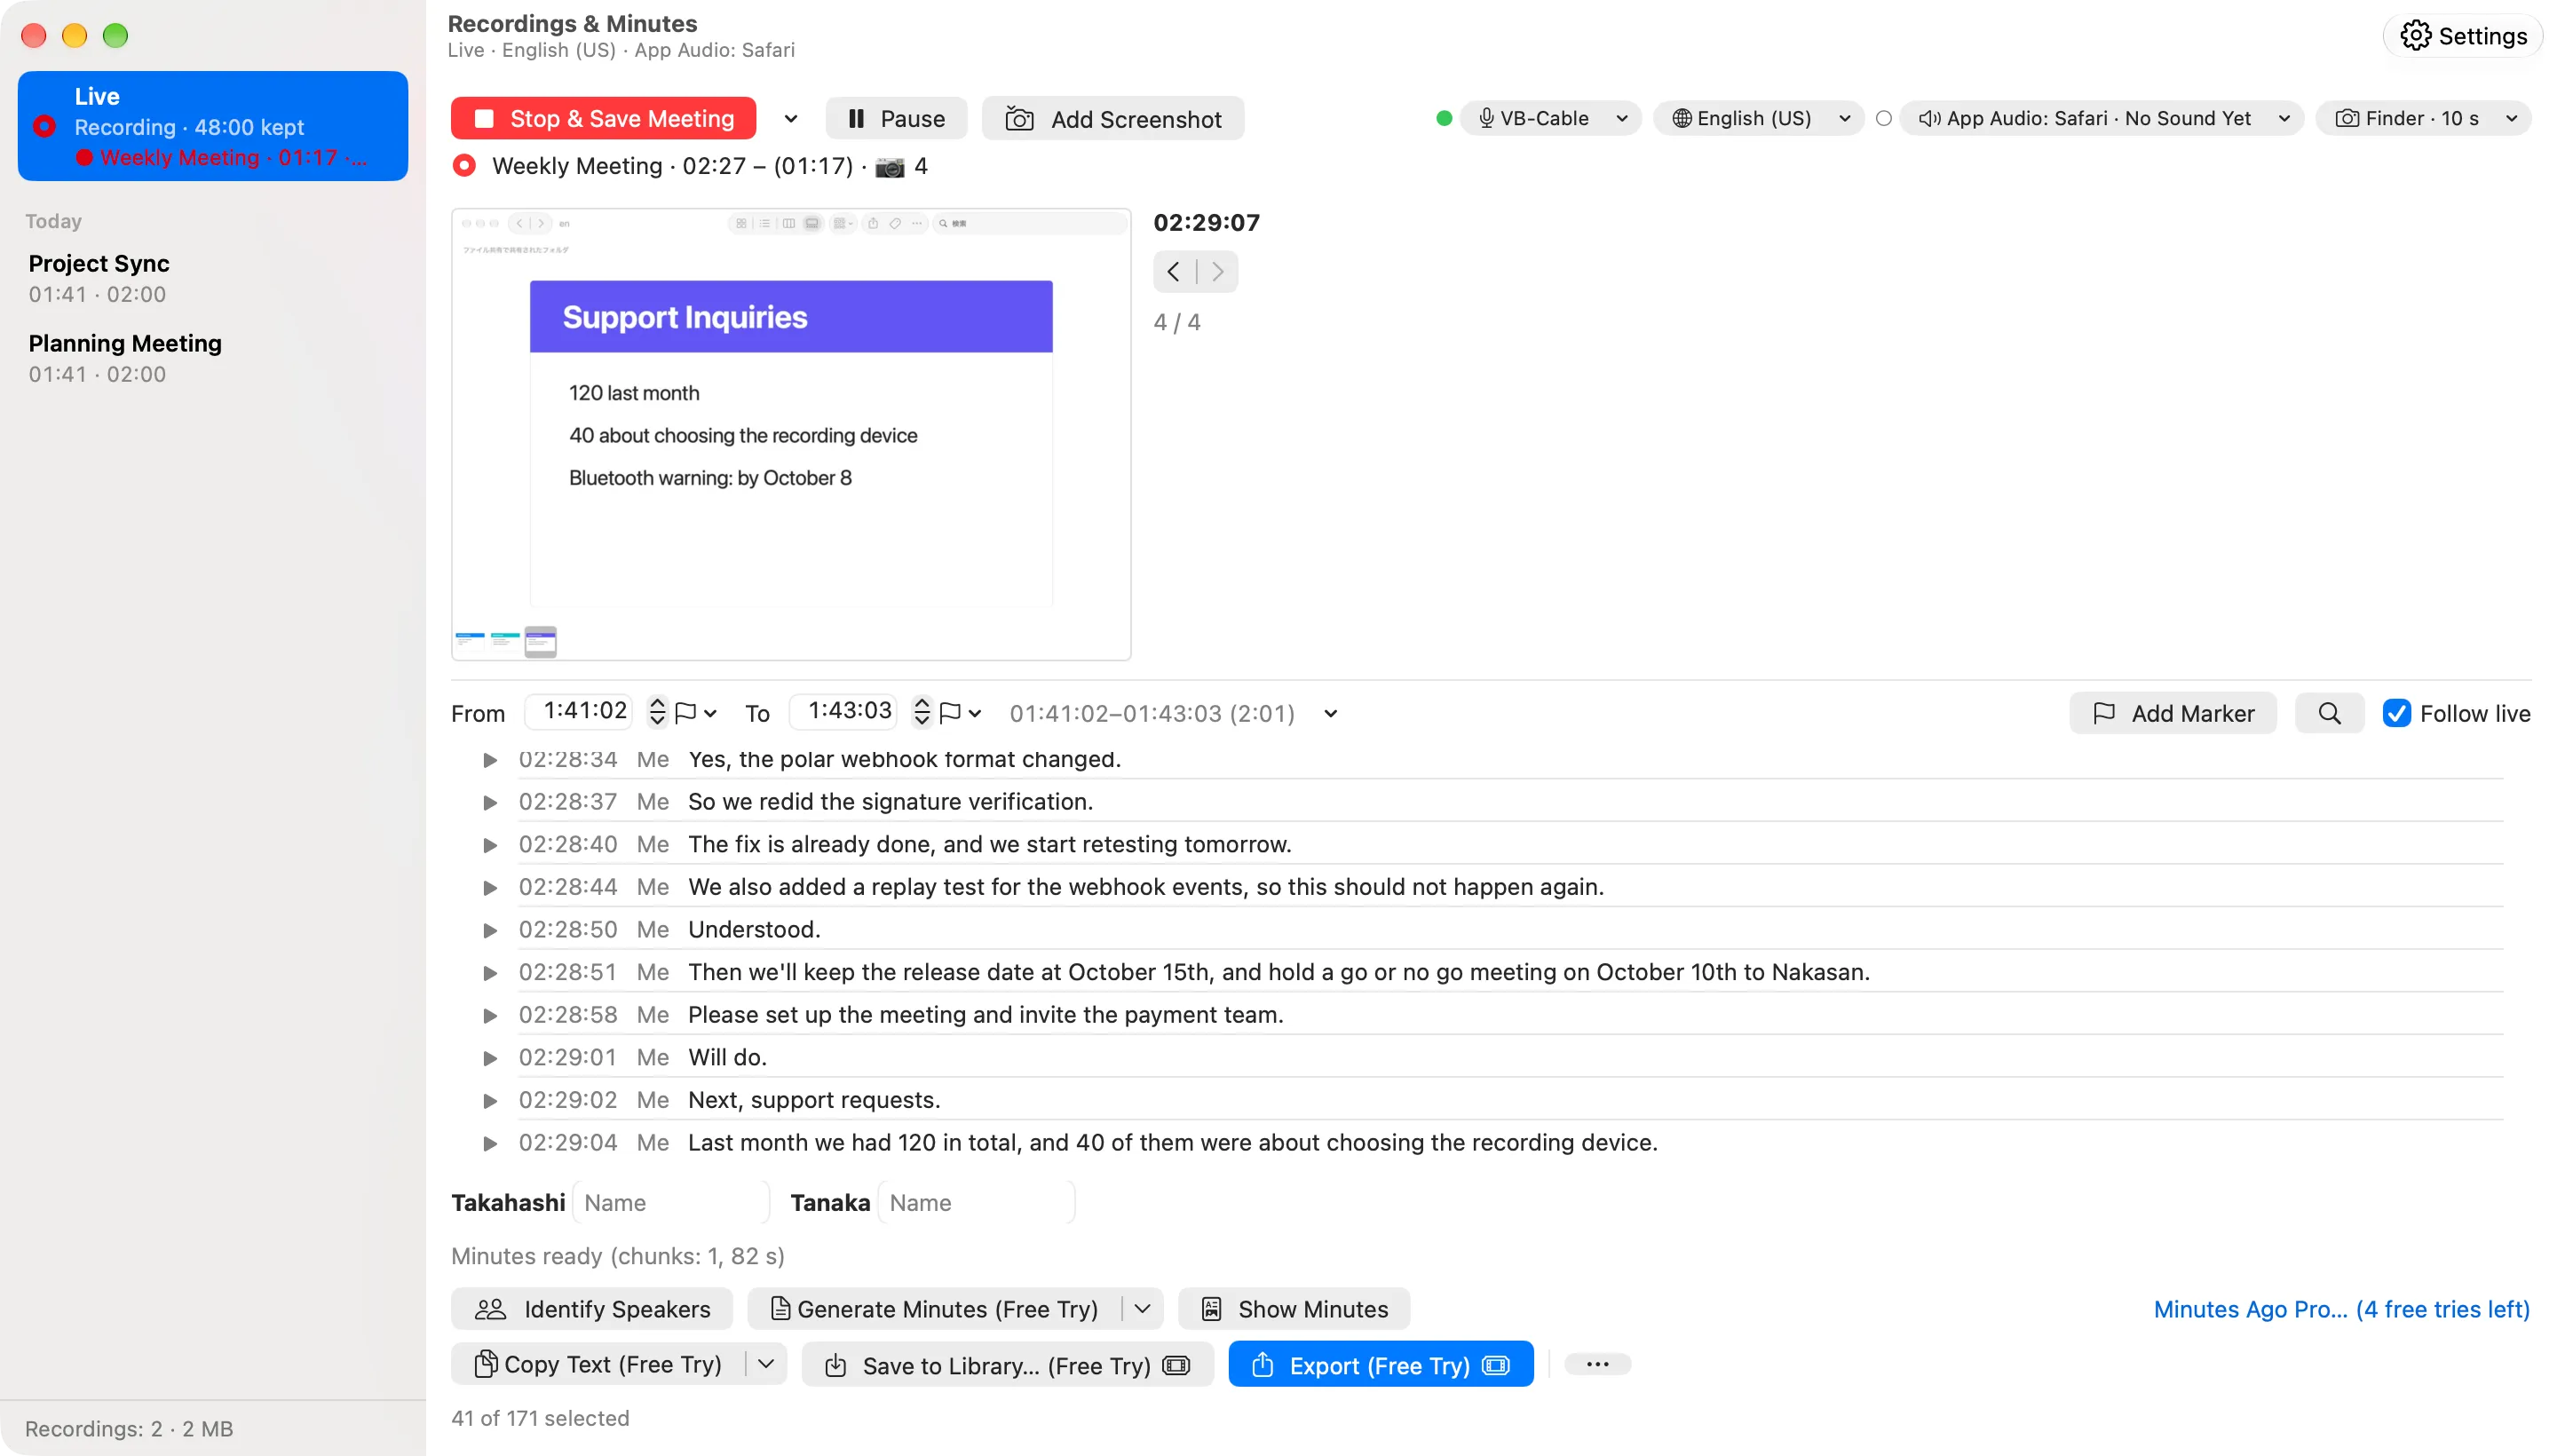
Screenshots can also go into minutes (Speakers and Minutes). Screenshots, Add Screenshot and meetings themselves are free.
Deleting a screenshot
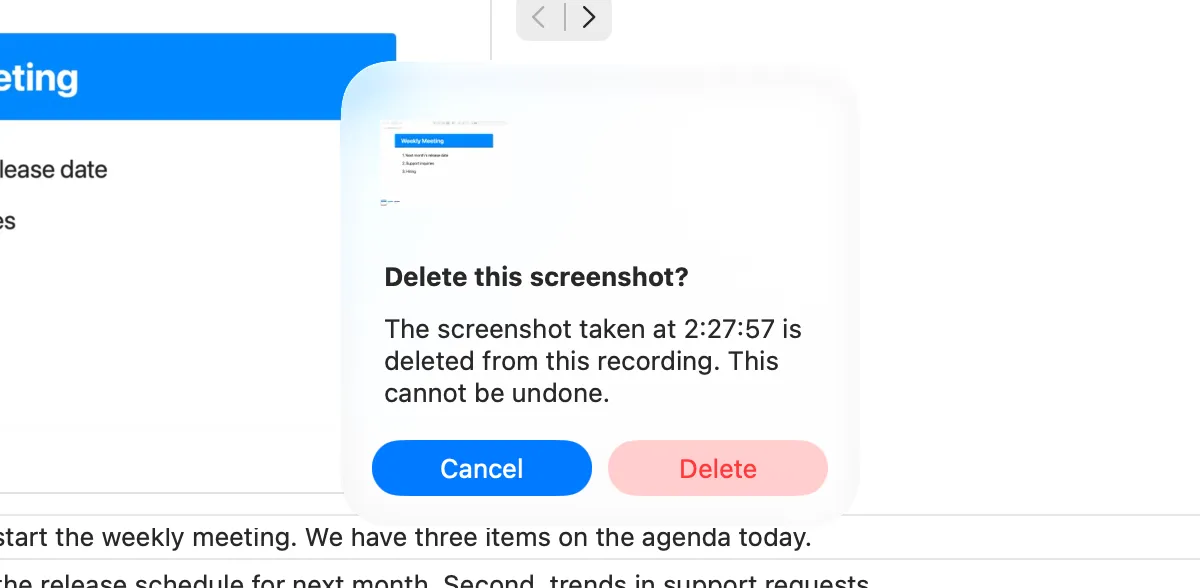
Right-click a screenshot in the screenshots pane and choose Delete Screenshot… to remove it from the meeting or from the saved recording.
- It always asks first (“Delete this screenshot?”); Cancel is the default, so only clicking Delete deletes it.
- It cannot be undone, and the screenshot does not go to the Trash.
- During a meeting, if the same thing is still on screen, a later screenshot can show it again. While something must not be captured, pause the meeting.
- Deleting a screenshot is free.
Saved recordings
Saved recordings stay on this Mac until you delete them, whatever Keep the last is set to. A recording holds its audio, transcript (one per model, if you transcribe it with other models), speaker labels and names, markers, screenshots and minutes.
Saving
- A meeting — Stop & Save Meeting (Meetings).
- A range — select it in the live pane and click Save to Library… (⇧⌘S), then give it a name.
- Agents and the Shortcuts app can save one too (
save_recording, Save Recording). - An audio or video file — Import Audio File… (⌘O), the + at the bottom of the left pane, or drop the file on the window. The file becomes a recording and is transcribed (Minutes Ago Pro; Importing Audio Files).
Saving counts like an export: free within the last 30 minutes without speaker names (app audio included), otherwise a free try (or Pro).
Opening a recording
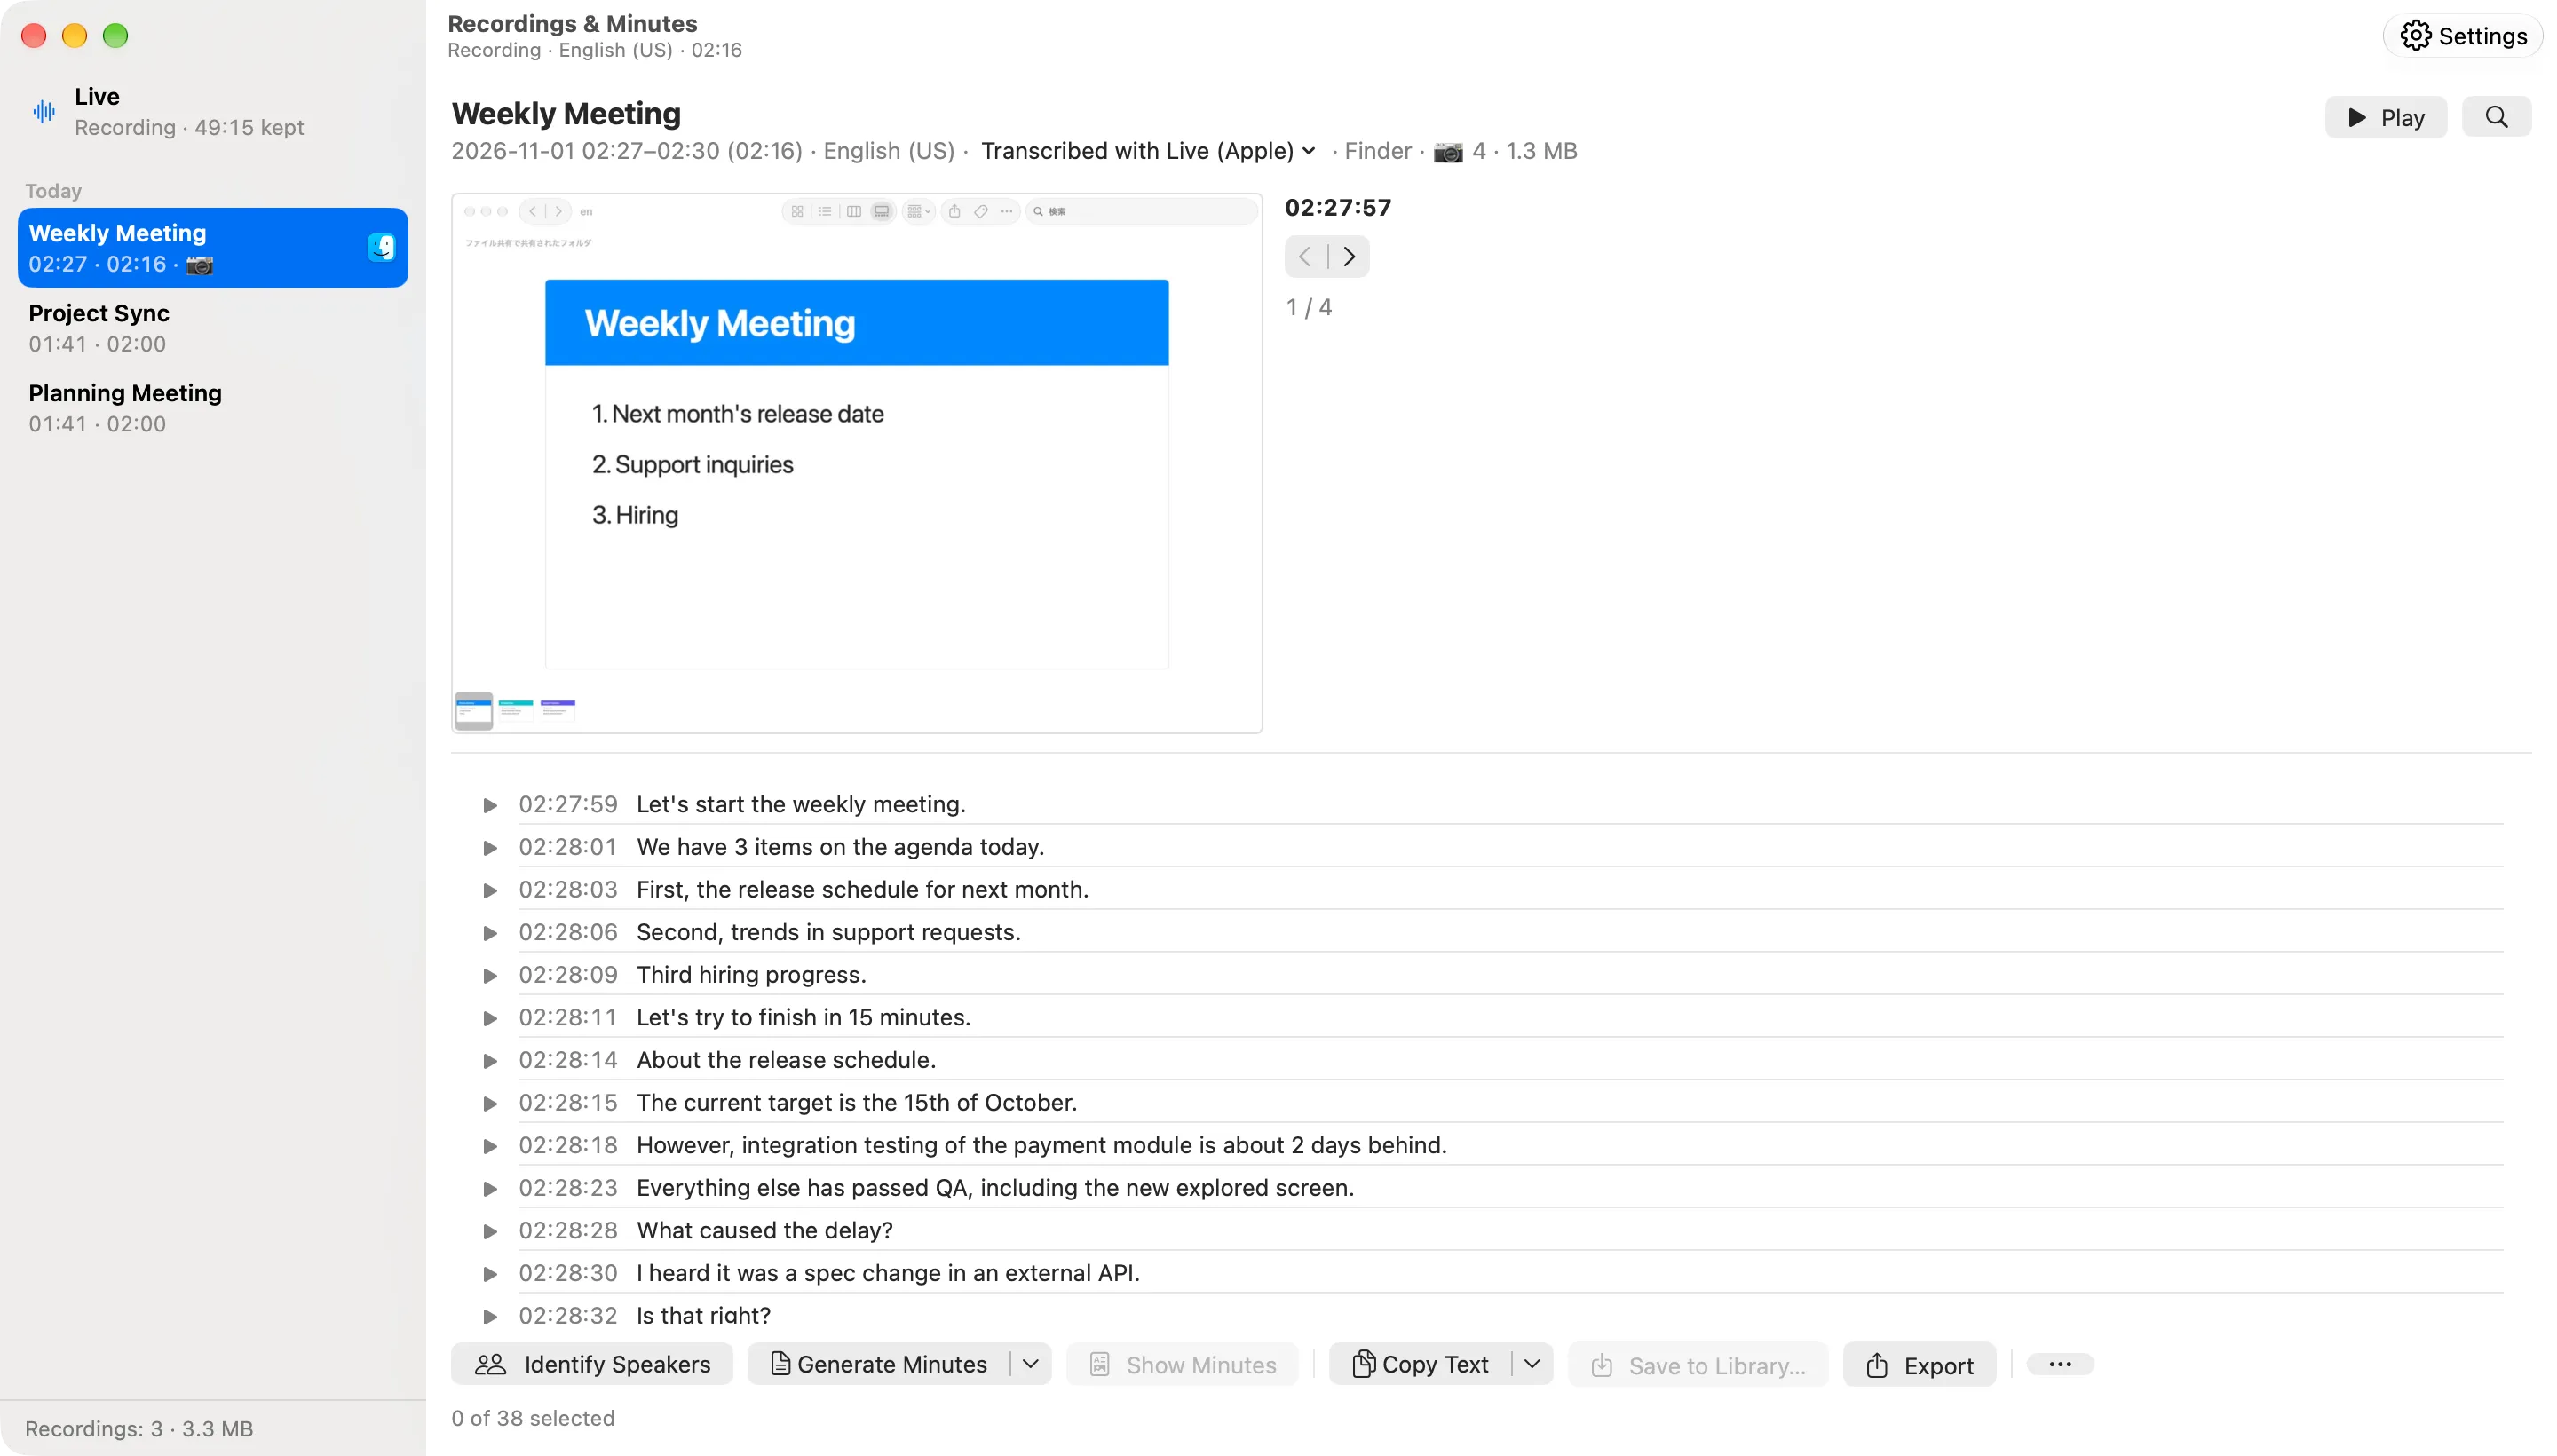
Click a recording in the left pane. Its pane shows the name (click it to rename), the date, time and length, the spoken language, the app (Audio File for a recording imported from a file, which also has a document icon in the left pane), the number of screenshots and the size, and the whole recording below it. There is no range: the buttons work on the whole recording (to copy some lines, select them and press ⌘C, or right-click and choose Copy).
- Play in the header plays the recording, and the ▶ of a line plays from that line (Playing lines).
- Transcribed with … in the header (for example “Transcribed with Whisper large-v3-turbo”) is a menu of the transcripts the recording keeps, one per model. Choose one to show it, or choose a model it has not been transcribed with yet to transcribe it now; Live (Apple) is the transcript made while recording. See A transcript for each model.
Reading, copying, exporting and writing minutes on this Mac for a saved recording are free, even for an old or long one, because saving already counted. The one exception: speaker names added after saving use a free try once, the first time you take them out.
Renaming, exporting and deleting
- Rename — click the name in the header, or Rename… in the right-click menu of the left pane.
- Export — Export (⌘E), or Export… in the right-click menu or the File menu, makes a folder in your export folder with the audio, the transcript, the screenshots and the minutes (Exported files).
- Show in Finder — in the right-click menu or the File menu, shows the recording’s folder in the app’s library in Finder, selected in its parent folder.
- Delete — Delete… in ⋯, in the right-click menu or in the File menu, after a confirmation. The recording is deleted with its audio, transcript, screenshots and minutes; this cannot be undone.
- To delete all of them, use Delete All Saved Recordings… in Settings › Library (it shows how many and how much space). Erase Live Audio… never deletes saved recordings.
Minutes of a recording
Generate Minutes in a recording writes minutes for the whole recording, and they are kept with it: Show Minutes opens them again later.
Transcribe Again
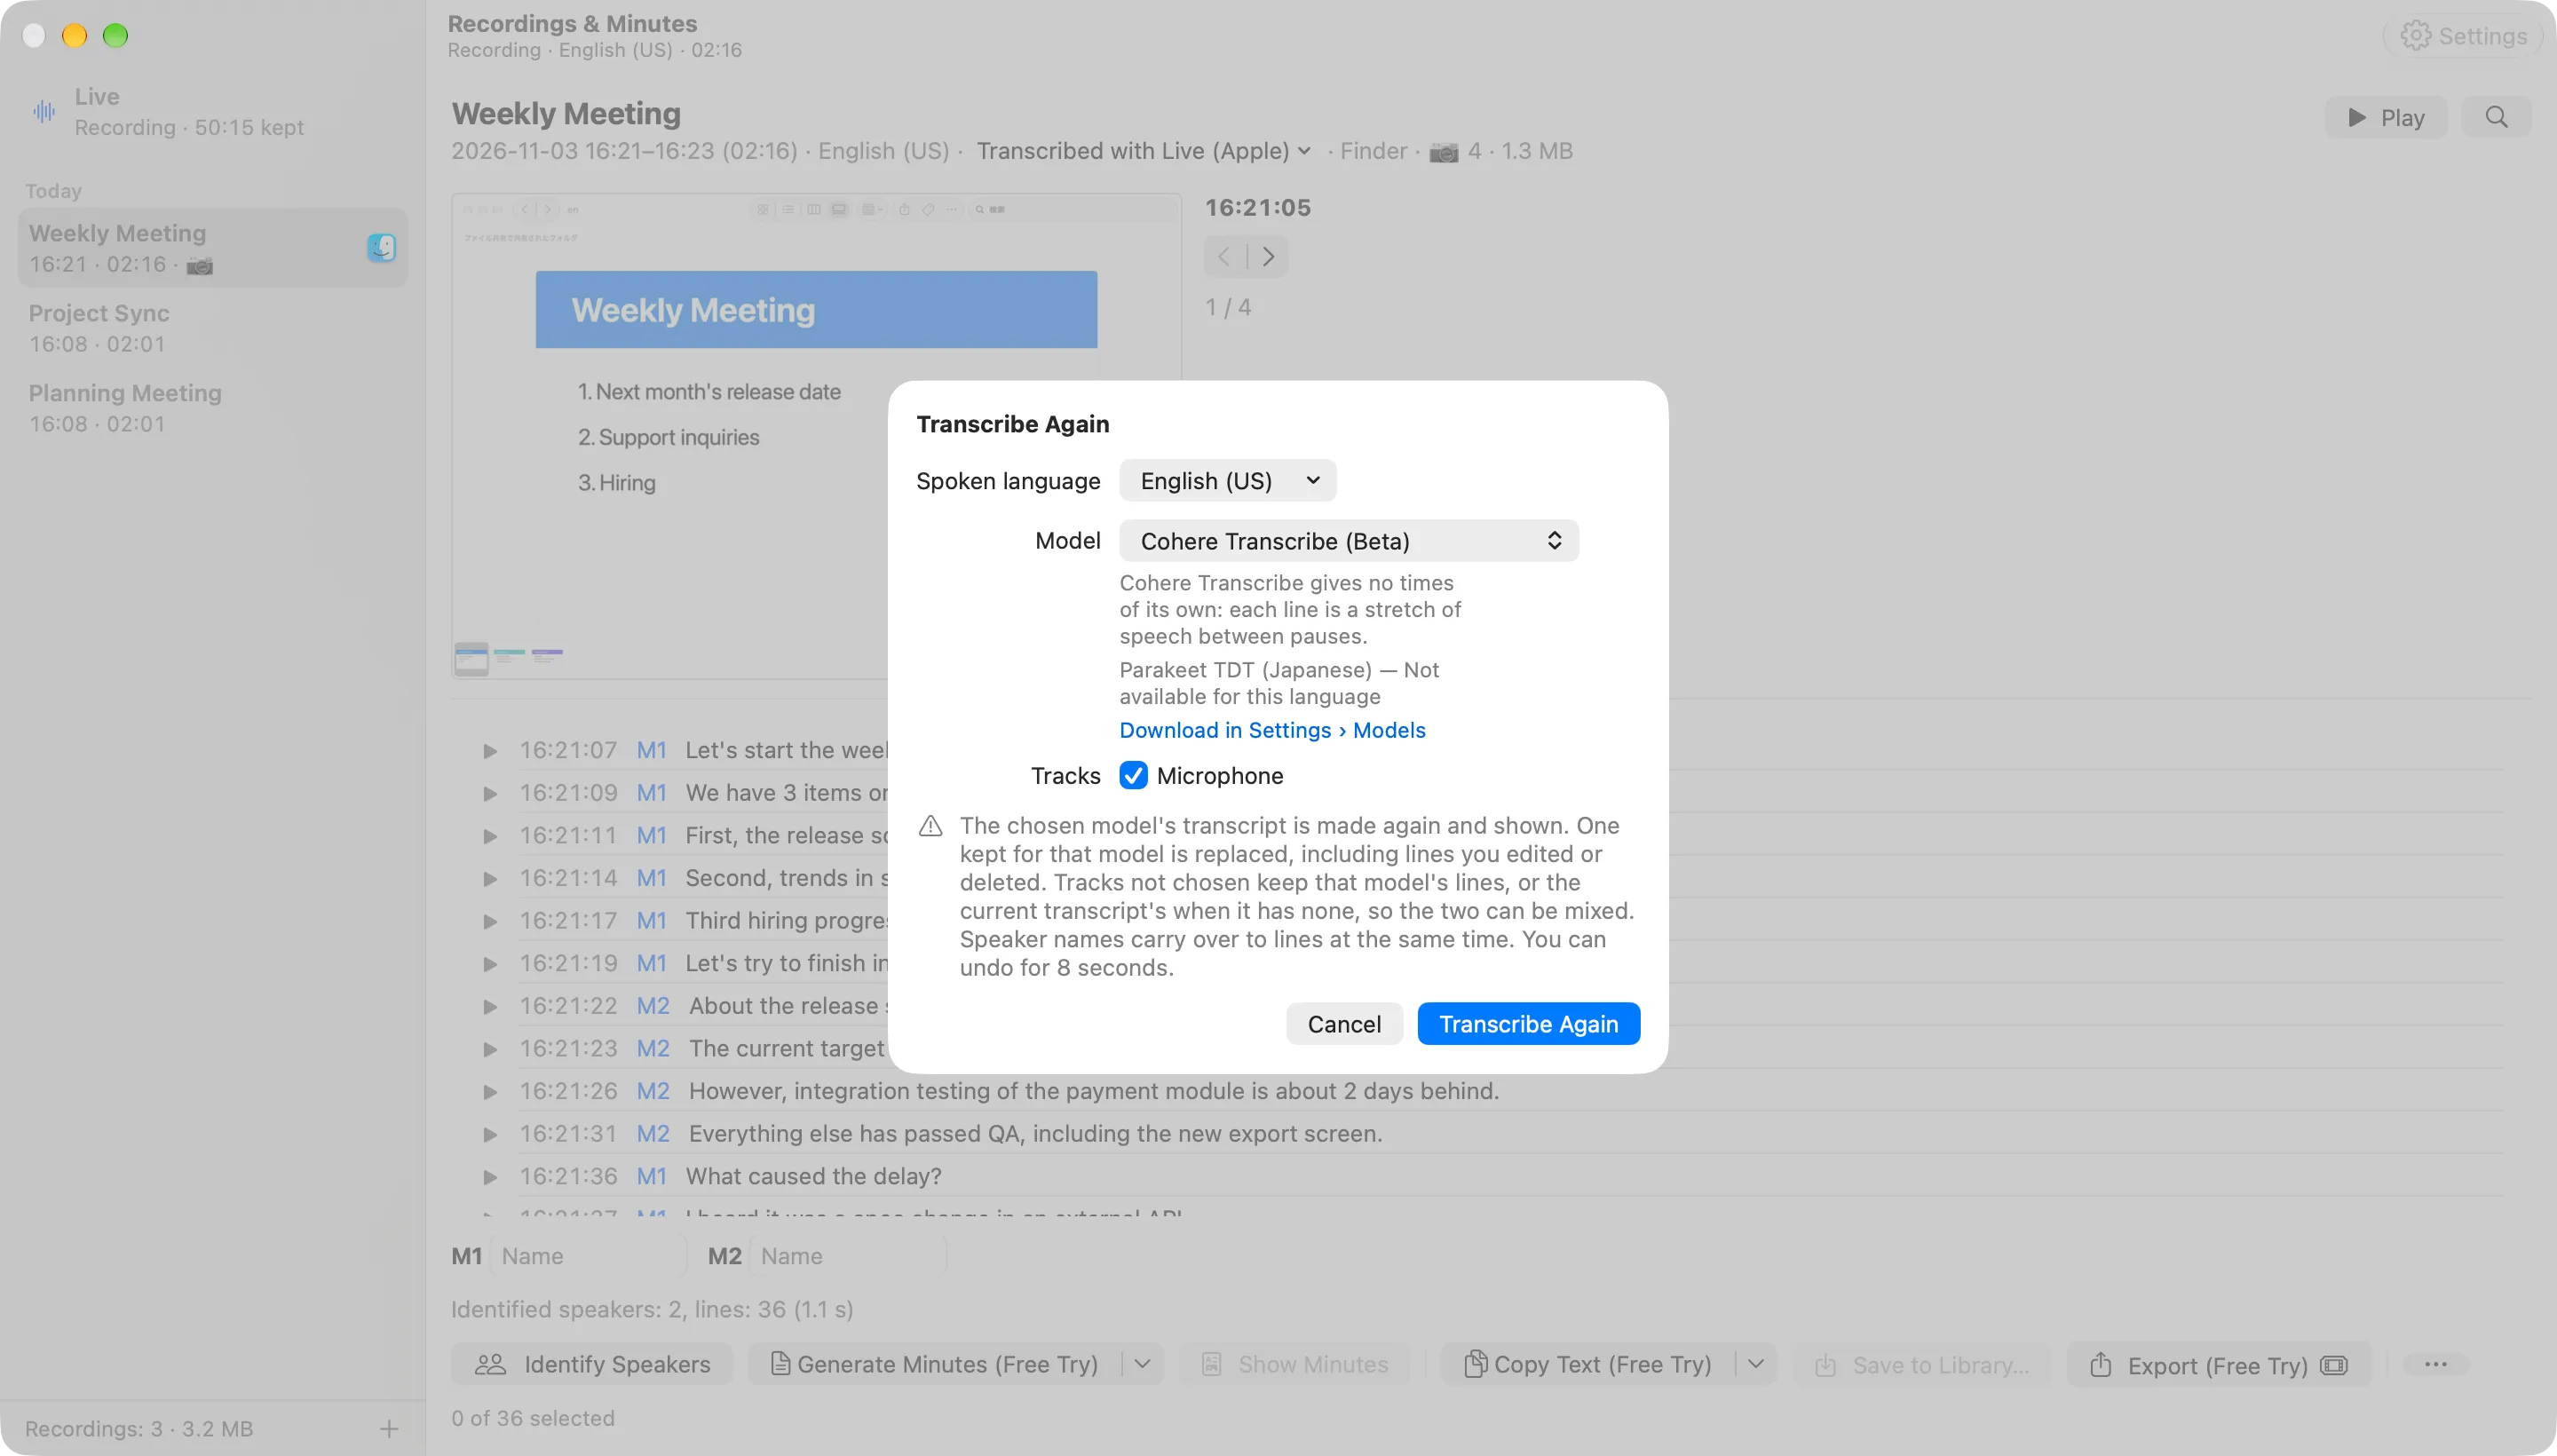
Recorded in the wrong language, or want another model’s transcript? In a saved recording, choose ⋯ › Transcribe Again… (or Transcribe Again with Options… in the Transcribed with … menu), pick the spoken language, the model and the tracks, and click Transcribe Again. Minutes Ago transcribes the recording again on this Mac (“Transcribing with Whisper large-v3-turbo · 40%”, with Cancel).
- The models are Apple (On Device) and, once downloaded in Settings › Models, Whisper large-v3-turbo, Whisper large-v3-turbo (Compact), Parakeet TDT (Japanese) and Cohere Transcribe (Beta). A model not downloaded yet is greyed out with “Download in Settings › Models” (Transcription and Models).
- The chosen model’s transcript is made again from the audio and shown. If the recording already keeps one for that model, it is replaced, including lines you edited or deleted (deleted lines come back). Tracks you don’t choose keep that model’s lines (or the current transcript’s when it has none), so the two can be mixed. Speaker names carry over to lines at the same time. Markers and minutes are kept (minutes made before say which transcript they were made from, such as “Made from the previous transcript”).
- For 8 seconds afterwards, Undo in the status line brings the previous transcript back.
- It is free and uses no free try.
- One transcription runs at a time: while a saved recording, a range of live audio or an imported audio file is being transcribed, the others can’t start (their Transcribe Again is greyed out: “Wait until the other transcription is done.”). Live transcription usually keeps running meanwhile; if this Mac can’t run both, it pauses until the run ends.
Export folder
The first time you save, a panel asks you to choose a folder (Use this folder). After that, Minutes Ago saves there without asking.
- Export folder in Settings › Library shows the current folder. Choose… changes it; Forget folder makes it ask again next time.
- The app never deletes exported files. Managing them is up to you.
Exported files
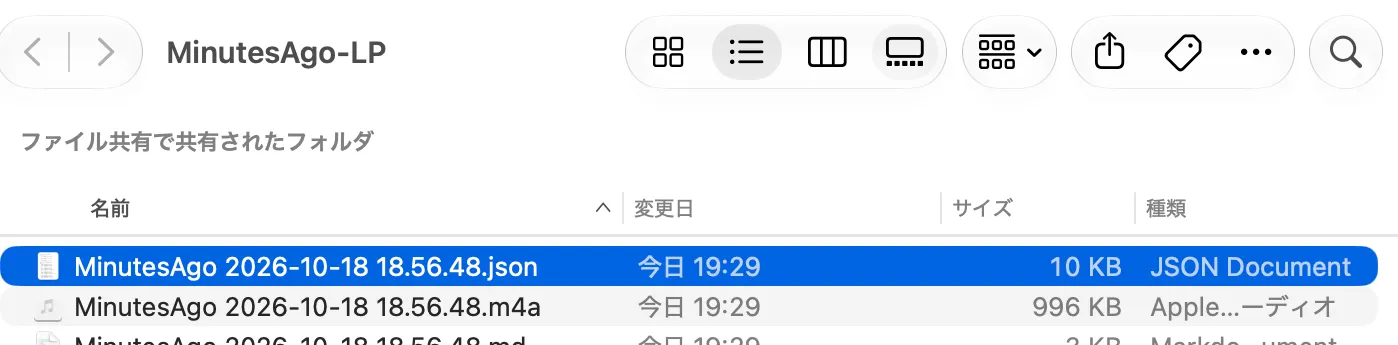
Export and Save the Last write files named after the start of the range, for example MinutesAgo 2026-09-27 21.25.14.
| File | Contents |
|---|---|
….m4a |
Audio (AAC) |
….txt |
Transcript, one line per utterance: [HH:mm:ss] speaker: text (the same as Copy Text). A line [HH:mm:ss] ⚑ name where each marker falls |
….md |
Transcript in Markdown: - **speaker** (HH:mm:ss): text. A heading ### ⚑ name (HH:mm:ss) where each marker falls, with a blank line before and after |
….json |
Transcript as JSON: the start and end of the range, and each utterance’s start, end, track, speaker and text, with markers at the top level (each with time and name, or null without a name). Times are ISO 8601 |
.mdand.jsonare written together with.txtwhen the range has transcribed lines.- The transcript has your replacement dictionary applied (Speakers and Minutes).
- Only markers inside the range are included (
markersin the.jsonis an empty array when there are none). Turning off Include markers (on by default; in ⋯ and in Settings › Library) leaves markers out of copied text, all three files and the minutes’{{markers}}(the.jsonthen has nomarkerskey at all). Save the Last follows the same setting. - For a range with app audio, the audio comes as two files, microphone and app (
… mic.m4aand… app.m4a), and the transcript as one (App Audio). With the microphone set to None, the app audio alone is one….m4a. - Exporting a saved recording makes a folder
MinutesAgo 2026-10-10 10.02.00with the same files inside, plus ashotsfolder with its screenshots and… minutes.mdwhen it has minutes. - Minutes are a separate file (
MinutesAgo … minutes.md), written only when you choose to save them. - Export Transcript writes one file (
.vtt,.srt,.mdor.txt) where you choose, named after the recording (or the start of the range in the live pane). - A recording imported from an audio file exports like any saved recording: the converted audio as
.m4aand the transcript as.txt,.mdand.json. Its times are times of day counted from the file’s date; for times elapsed from the start of the file, use Export Transcript… with Timestamps set to Elapsed Time.
Microphone
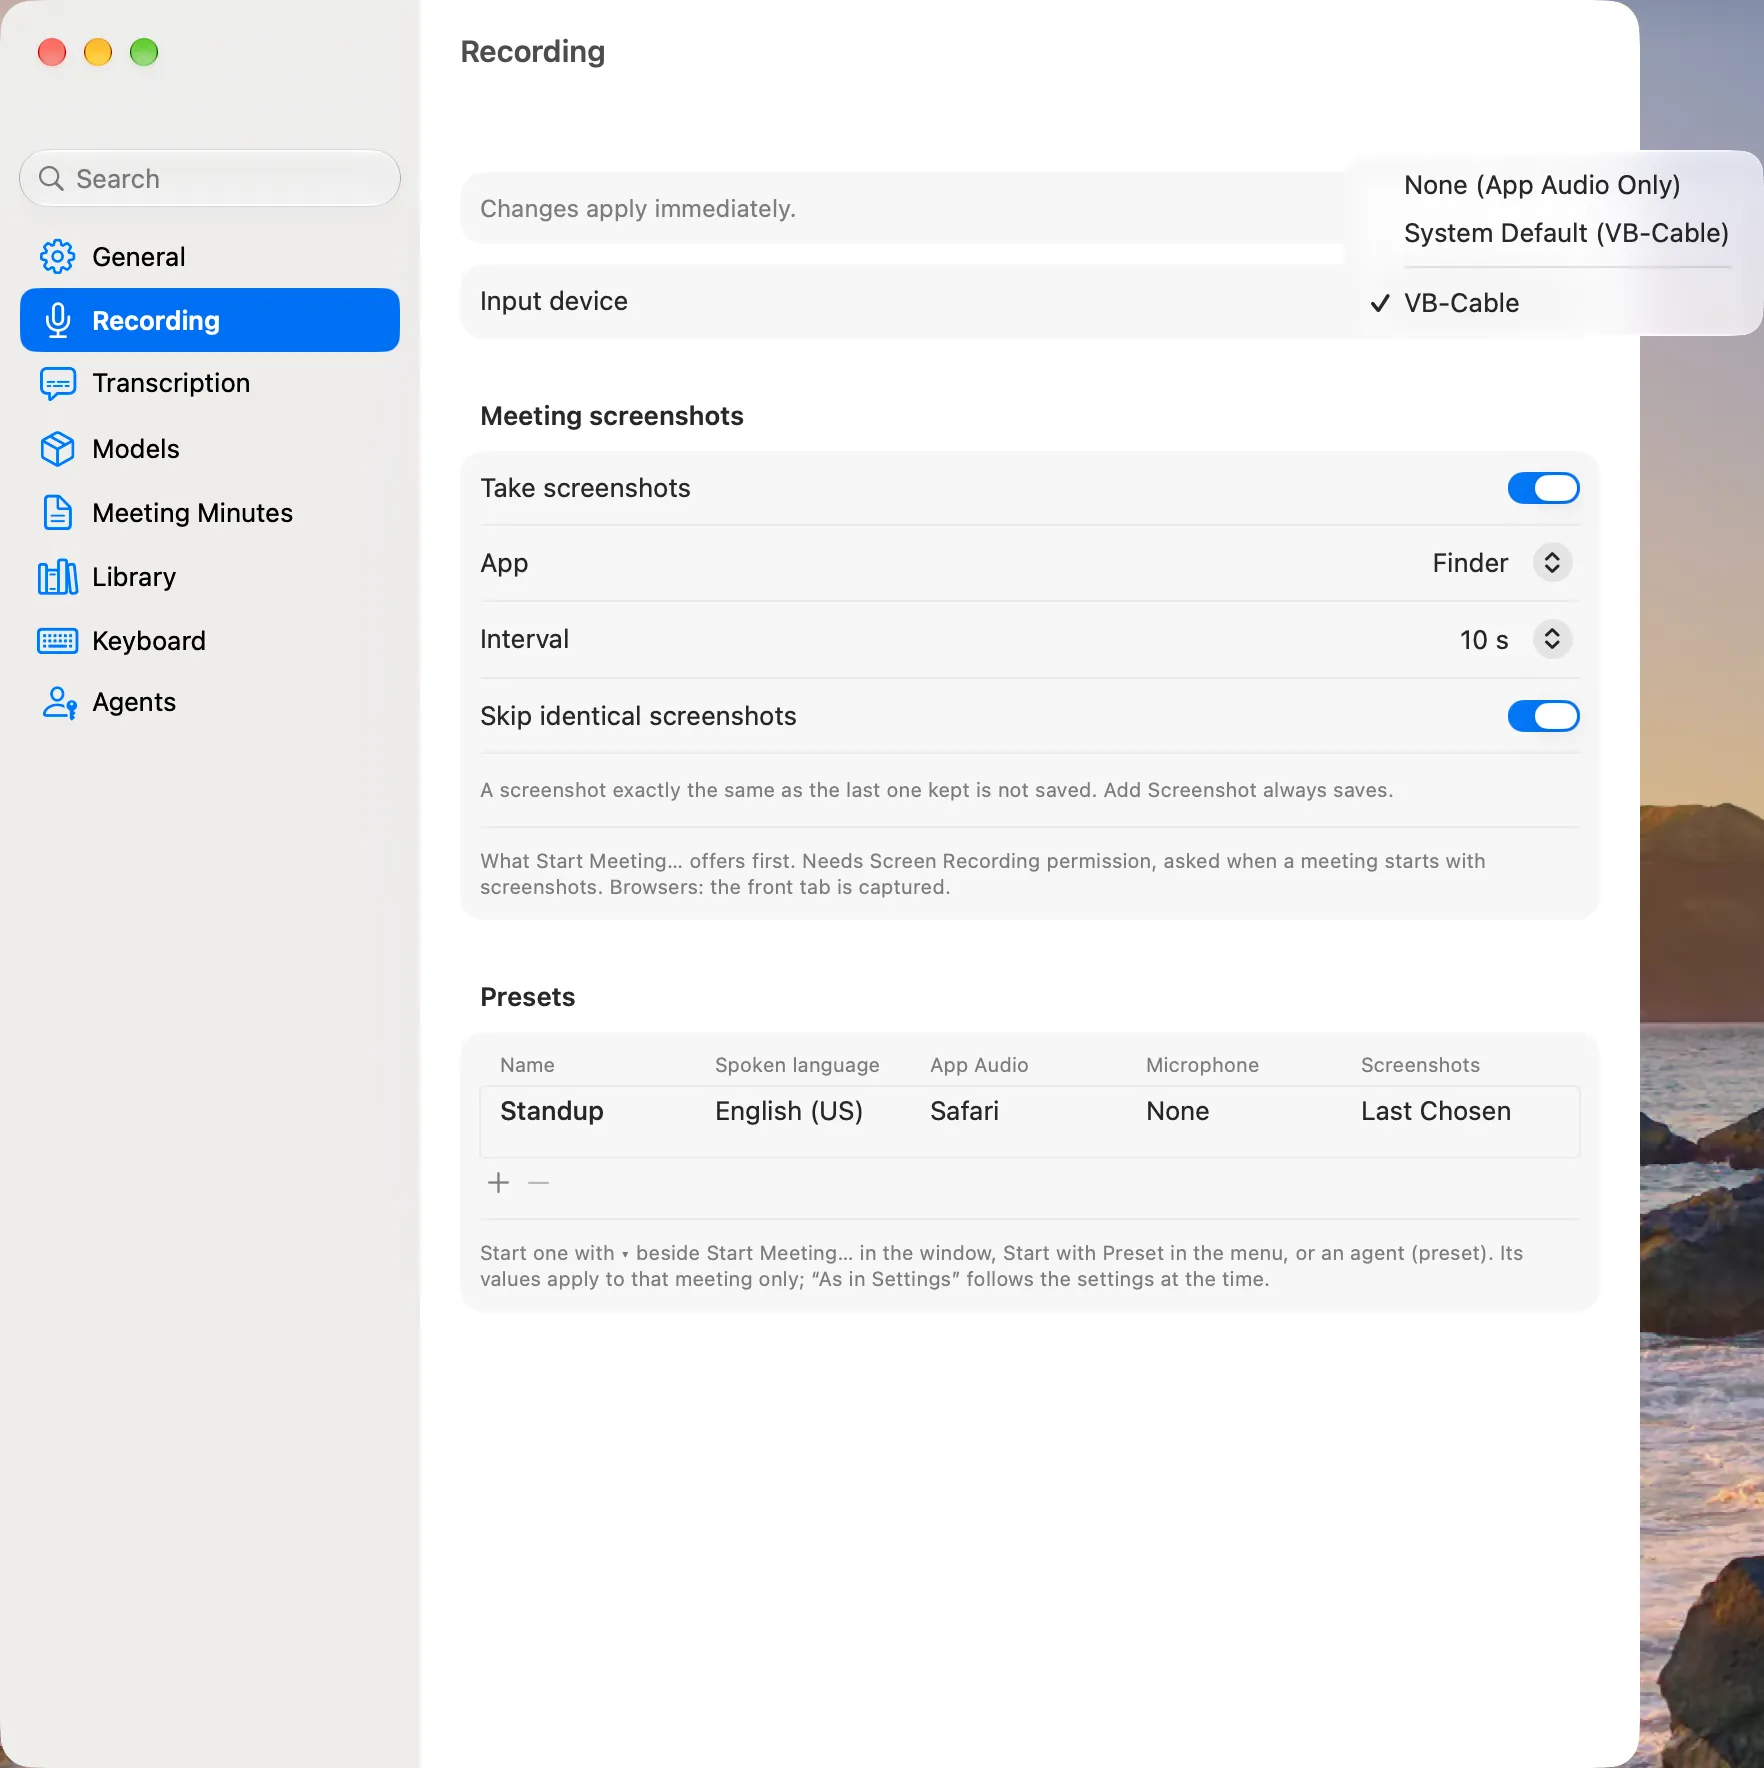
Choose the microphone to record with the microphone chip in the window, in the Start Meeting window, or with Input device in Settings › Recording. Minutes Ago follows devices being plugged in and removed.
- System Default (name) follows the Mac’s default input: when you plug in headphones, change the input in System Settings or connect AirPods, Minutes Ago switches with it. The chip shows the microphone in use. A new installation follows the default from the start; a microphone you chose in an earlier version stays as it is.
- A microphone in the list fixes the recording to it. If it is not connected, it is listed as “name (Not Connected)”.
- None (App Audio Only) records only the other participants’ audio from App Audio. The chip turns orange with a slashed icon so you can see it from across the room. If App Audio is None too, nothing is recorded, and the menu says so in orange with Use the Microphone.
- Bluetooth microphones are marked “(Bluetooth)” in the list, and choosing one shows a warning: Bluetooth microphones often deliver narrow-band audio and can drop out. A built-in, USB or wired microphone gives better recordings and transcripts. While following System Default, if the default becomes a Bluetooth microphone, the warning (in the menu and under Input device) starts with “System default input is now name.” and offers Use name, which fixes the microphone to another one (the built-in microphone first, then USB).
- Presets don’t offer System Default: As in Settings follows your setting.
- Before the Mac sleeps, Minutes Ago stops recording, and it starts again after the Mac wakes. If the microphone can’t start, the menu and the meeting bar show “The microphone could not start (…) · Try Again”, and Minutes Ago tries again by itself (after 15 seconds, 30 seconds and 1 minute, then up to every 5 minutes, and at once when an input device changes). App audio is recorded meanwhile, and Pause ▸ still works.